20 Small Basement Ideas That Maximize Every Square Foot (…

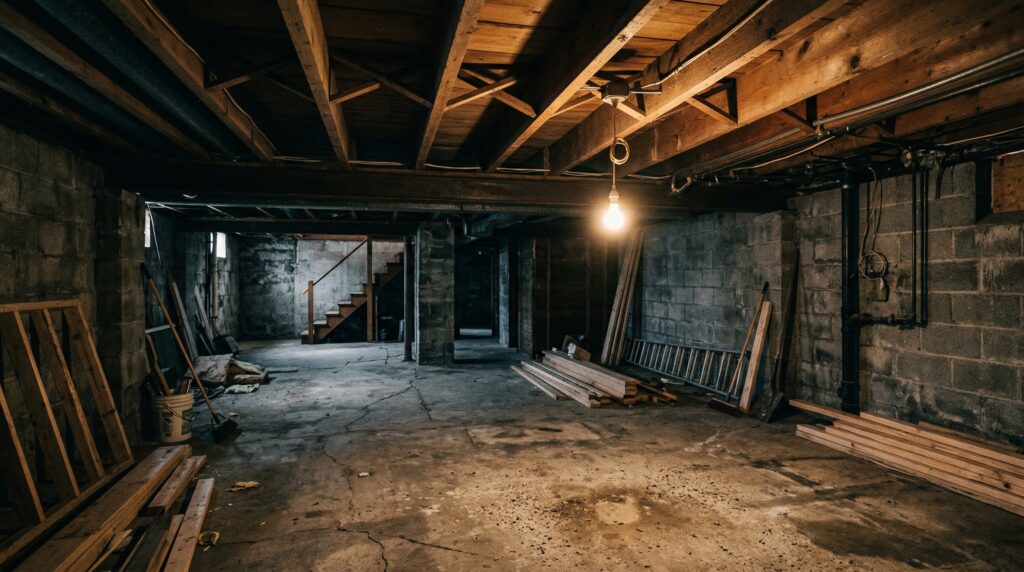
Not every basement is a sprawling 1,500-square-foot blank canvas. Many Utah homes — especially ramblers from the 1960s-80s, split-levels, and older construction — have compact basements of 400-800 square feet with lower ceilings, support columns, and awkward layouts.

Good news: a small basement doesn’t mean a useless basement. With smart design, every square foot pulls its weight. We’ve finished hundreds of compact basements across Utah and learned exactly what works in tight spaces.

Layout & Design Strategies

1. The Open-Concept Multi-Use Room

In a small basement, walls eat square footage. Instead of dividing 600 square feet into three tiny rooms, keep it open and define zones with furniture, area rugs, and lighting instead of walls.

Example layout (600 sq ft):
– Living/TV zone with sectional and mounted TV
– Office nook in one corner with a desk and task lighting
– Play area along one wall with low storage bins
– All in one open space that feels much larger than three cramped rooms

Cost: $18,000-$28,000 for a basic open-concept finish

Pro Tip: The only rooms that truly need walls in a basement are bathrooms (plumbing + privacy) and bedrooms (egress + fire code). Everything else can stay open.

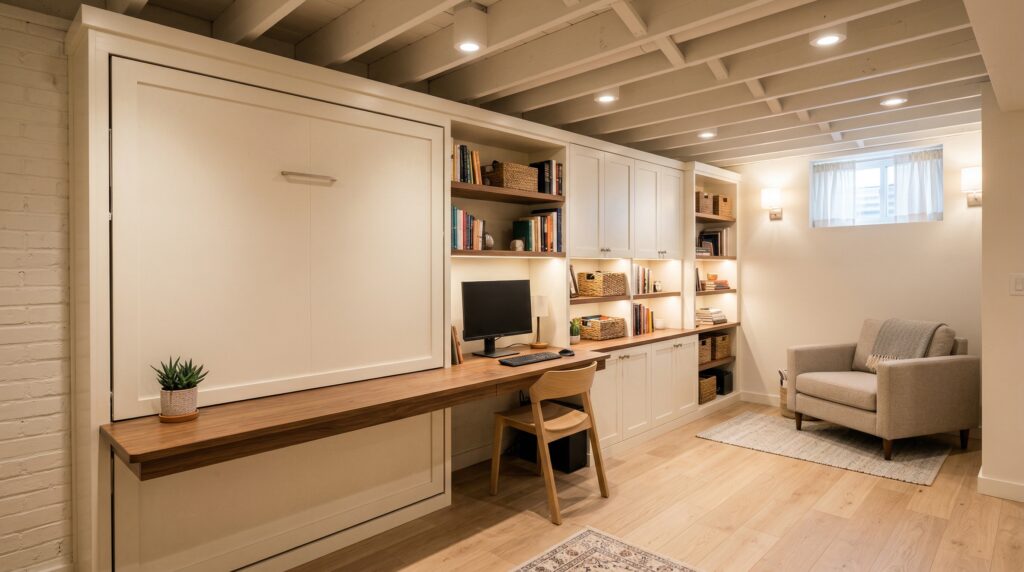
2. Built-In Everything

In small basements, freestanding furniture wastes space. Built-in solutions use every inch:

  • Built-in desk along a wall (no legs stealing floor space)
  • Floating shelves instead of bookcases
  • Window seat with storage under egress windows
  • Murphy bed that folds into the wall when not in use
  • Built-in entertainment center recessed into the wall between studs
  • Bench seating along walls with storage underneath

Cost: $500-$3,000 per built-in feature

3. The L-Shaped or Galley Layout

If your basement has a long, narrow shape (common in older Utah homes), embrace it. Design a galley layout with activity zones along the length:

Zone 1 (near stairs): Entry/mudroom/storage
Zone 2 (middle): Living/entertainment area
Zone 3 (far end): Bedroom or office

Run the layout like a train car — each zone flows into the next without wasted hallway space.

4. Light Colors and Strategic Lighting

Small basements feel smaller when they’re dark. Fight the cave effect with:

  • Light wall colors — White, light gray, soft warm whites. Avoid dark colors on walls.
  • Recessed LED lighting on dimmers — Adjustable brightness that opens up the space
  • Under-cabinet LED strips along built-ins — Adds depth without overhead glare
  • Light-colored flooring — Light gray LVP or light carpet
  • Mirrors on walls — The oldest trick in the book, and it works
  • Egress windows — Even one window dramatically changes how a basement feels

5. Pocket Doors and Barn Doors

Standard doors need 3 feet of swing clearance. In a small basement, that’s a lot of wasted floor space. Pocket doors slide into the wall (zero floor space). Barn doors slide along the wall (minimal floor space).

Cost: Pocket doors $300-$800 installed. Barn doors $200-$600 plus hardware.

Room-Specific Ideas for Small Basements

6. Compact Home Office (50-80 sq ft)

A productive home office doesn’t need a lot of space. A corner or nook is enough.

What you need:
– Built-in desk (30″ deep minimum)
– Shelving above the desk
– Dedicated electrical with enough outlets for equipment
– Ethernet drop (Wi-Fi through basement floors is unreliable)
– Task lighting plus ambient overhead
– Sound-absorbing panel on the wall behind your video call background

Cost: $3,000-$8,000 as part of a larger basement finish

7. Half Bathroom (25-35 sq ft)

A half bath (toilet + sink) fits in a remarkably small footprint. Even 5×5 feet works if the layout is smart.

Space-saving tricks:
– Corner sink or wall-mounted sink (no vanity eating floor space)
– Pocket door instead of swing door
– Wall-mounted toilet for easier cleaning and visual space

Cost: $5,000-$10,000

Pro Tip: Even if you don’t add a full bathroom, a half bath in the basement is one of the highest-value additions you can make. Nobody wants to walk upstairs every time.

8. Cozy Media Nook (100-150 sq ft)

Not a full theater — just a dedicated spot for watching TV or gaming with proper seating and sound.

  • 65″ TV mounted on the wall (takes zero floor space)
  • Love seat or oversized bean bags instead of a sectional
  • Sound-dampening panels on the back wall
  • Dimmable lighting
  • Built-in shelving for games, controllers, and media

Cost: $5,000-$12,000 (as part of a finish, not counting TV/equipment)

9. Guest Bedroom (100-120 sq ft)

A legal bedroom needs an egress window, a closet, and enough space for a bed. An 10×12 room checks all the boxes.

Space maximizers:
– Queen Murphy bed that folds up to reveal a desk or shelving
– Built-in nightstands (floating shelves beside the bed)
– Closet with organization system (wire shelving, double-hung rods)
– Recessed lighting (no table lamps eating surface space)

Cost: $8,000-$15,000 (including egress window)

10. Playroom That Converts (150-200 sq ft)

Design the kids’ playroom to convert as they grow. What’s a playroom at age 5 becomes a gaming room at 12 and a study at 16.

Convertible features:
– Wall-mounted fold-down table (activity table now, study desk later)
– Modular storage cubes that reconfigure
– Chalkboard or whiteboard wall (creative play now, homework later)
– Neutral base colors with changeable accent decor

11. Laundry Room Upgrade (40-60 sq ft)

If your washer/dryer already lives in the basement, build a proper laundry room around them. Even 6×8 feet is enough.

  • Counter over front-load machines for folding
  • Overhead cabinets for supplies
  • Hanging rod for air-dry items
  • Pull-out hamper bins
  • Utility sink if plumbing allows

Cost: $3,000-$7,000

12. Exercise Corner (80-120 sq ft)

You don’t need 400 square feet for a home gym. A compact exercise area fits more than you’d think:

  • Rubber flooring section ($2-$4/sq ft)
  • Wall-mounted fold-up weight bench
  • Resistance band anchor points in walls
  • Mirror on one wall
  • Ceiling-mounted TRX or pull-up bar
  • TV mounted for workout videos

Cost: $2,000-$5,000 (space, not equipment)

13. Reading Nook / Library Wall

Turn a corner or alcove into a dedicated reading retreat:

  • Floor-to-ceiling bookshelves on one or two walls
  • Comfortable armchair with good task lighting
  • Small side table
  • Acoustic isolation from the rest of the basement (even just heavy curtains)

Cost: $1,500-$4,000

14. Craft/Hobby Alcove (60-100 sq ft)

A dedicated workspace that doesn’t dominate the basement:

  • Built-in work surface at counter height (36″)
  • Pegboard wall for tools and supplies
  • Overhead cabinets to keep supplies dust-free
  • Good task lighting (daylight-spectrum LEDs)
  • Easy-clean flooring under the work area

Cost: $2,000-$5,000

15. Pet Space (30-50 sq ft)

A dedicated pet area with:

  • Built-in feeding station (raised bowls, food storage drawer below)
  • Dog crate nook built into cabinetry
  • Cat litter box enclosure with ventilation
  • Easy-clean tile flooring
  • Pet wash station (if plumbing is nearby)

Cost: $500-$3,000

Visual Tricks for Small Basements

16. Horizontal Design Lines

Horizontal lines make spaces feel wider. Use them through:

  • Shiplap or horizontal plank walls
  • Long, horizontal shelving
  • Wide-plank flooring laid lengthwise
  • Horizontal stripe accent walls

17. Consistent Flooring Throughout

Using the same flooring throughout an open basement (no transitions between rooms) makes the space feel continuous and larger. LVP works perfectly for this — one material from wall to wall.

18. Strategic Mirror Placement

A large mirror on the wall opposite any window (especially an egress window) doubles the natural light and creates the illusion of depth. It’s the most cost-effective visual trick available.

Cost: $50-$300 for a large wall mirror

19. Minimalist Color Palette

Stick to 2-3 colors maximum throughout a small basement. Busy patterns and contrasting colors in a compact space create visual noise that makes it feel cluttered even when it’s clean.

Winning palette for small Utah basements:
– Walls: Light warm white or pale gray
– Trim: White
– Accent: One statement color in furniture or decor
– Flooring: Light to medium tone

20. Ceiling Treatment That Adds Height

In low-ceiling basements (7-7.5 feet):

  • Paint the ceiling white — It disappears visually
  • Use flush-mount or recessed lighting — Nothing hanging down
  • Avoid crown molding — It visually lowers the ceiling
  • Run vertical elements on walls — Vertical shiplap or tall artwork draws the eye up
  • Consider a painted exposed ceiling — You gain the inches that drywall would steal

Pro Tip: In a 7-foot basement, every inch matters. Standard drywall on the ceiling loses 1-1.5 inches. A painted exposed ceiling loses zero. That might sound trivial, but the difference between 6’10” and 7′ is the difference between “this feels tight” and “this feels fine.”


Small Basement Finishing Costs in Utah

Scope Size Estimated Cost
Basic open finish 400-600 sq ft $15,000 – $25,000
Mid-range (bedroom, half bath, living area) 500-800 sq ft $25,000 – $40,000
Premium (full bath, custom built-ins, high-end finishes) 500-800 sq ft $35,000 – $55,000

Small basements cost more per square foot than large ones because fixed costs (permits, bathroom plumbing, egress windows, HVAC) are spread across fewer square feet. But the total project cost is still lower, making it accessible for more homeowners.

Ready to Maximize Your Small Basement?

Small basements are our specialty. We’ve turned 400-square-foot spaces into the most-used rooms in the house. Call 801-515-3473 or get your free estimate — we’ll show you what’s possible.

Ready to Start Your Basement Project?

Get a free, no-obligation quote from Utah’s trusted basement finishing experts.

Get Free Quote

Written by

Korey Farr

Owner & Lead Contractor · 20+ Years Experience

Owner of SALT LLC and founder of Utah Basement Finishing. With over 20 years of basement finishing and remodeling experience across the Wasatch Front, Korey has personally overseen 500+ basement transformations. Licensed, bonded, and insured — Korey and his team deliver premium craftsmanship on every project.

View all articles →

Source

Disclaimer: all images are owned and copyright by their respective owners and website (utbasementfinishing.com) and “https://madcitybasement.com/blog” is for news, information, product news and reviews.

Calgary’s Best Vinyl Decks and Railings Calgary Company Online Reviews & Ratings

Expert Deck Renovation and Vinyl Decking in Calgary

Calgary’s Best Vinyl Decks and Railings is a trusted local company specializing in deck renovation, repair, and maintenance-free decks. With a decade of experience serving Calgary homeowners, the team is known for delivering durable, well-built decks that look great and are well-protected. Their focus on quality workmanship and reliable service has made them a go-to choice for homeowners looking to upgrade or restore their outdoor spaces.

The company offers a full range of services, including deck restoration, refacing, and structural troubleshooting. Whether a deck has suffered wear over time or was not built correctly to begin with, their team carefully assesses the structure and provides practical solutions.

A key part of their approach is understanding how water affects a home, ensuring every deck is built or repaired to help prevent moisture issues and extend the life of the structure.

Calgary’s Best Vinyl Decks and Railings also installs a variety of railing systems and finishes. Homeowners can choose from aluminum railings, framed or frameless glass options, and privacy walls to enhance both safety and style. They also specialize in maintenance-free decking systems, including vinyl, composite decking, and liquid coatings, offering clients long-lasting options that require minimal upkeep.

What sets the company apart is its attention to detail and commitment to customer satisfaction. Every project is customized to fit the home and the homeowner’s goals, with clear communication throughout the process.

By using high-quality materials and experienced installers, Calgary’s Best Vinyl Decks and Railings delivers outdoor spaces built to withstand Calgary’s climate while providing lasting value and peace of mind.

Build your dream outdoor living space. Contact Calgary’s Best Vinyl Decks and Railings!

Source

Disclaimer: all images are owned and copyright by their respective owners and website (blog.renovationfind.com) and “https://madcitybasement.com/blog” is for news, information, product news and reviews.

22 Unfinished Basement Ideas to Transform Your Space (2025)

So you’ve got an unfinished basement. Concrete floors, exposed joists overhead, maybe a water heater in the corner and some boxes you haven’t opened since you moved in. Sound familiar?

Here’s the thing — your unfinished basement is either wasted space or an opportunity. And you don’t always need a full $40K renovation to make it useful. Some of these ideas work with the raw space as-is. Others are stepping stones toward a full finish. All of them are better than letting your basement collect dust.

We’ve finished 500+ basements across Utah, and many of our clients started with one of these ideas before committing to a full build-out.

Quick Wins (Minimal Investment)

1. Organized Storage System

Before you finish anything, get the chaos under control. Industrial shelving, clear bins, and zone-based organization turn a basement from a dumping ground into functional storage.

What you need:
– Heavy-duty wire or steel shelving units ($50-$150 each)
– Clear storage bins with labels
– Wall-mounted hooks for bikes, tools, and gear
– Dehumidifier if moisture is a concern ($200-$400)

Cost: $300-$1,000

Pro Tip: Create zones — holiday decorations, camping/outdoor gear, kids’ outgrown stuff, tools. When everything has a home, the basement feels 10x bigger and you can actually find things.

2. Laundry Upgrade

Your washer and dryer are already down there. Why not make the space around them functional and pleasant?

  • Add a folding table or counter above front-loaders
  • Install a hanging rod for air-dry items
  • Bright LED shop lights overhead ($30-$50 each)
  • Rubber interlocking floor mats in the laundry area ($1-$2/sq ft)
  • Peel-and-stick backsplash behind machines for a finished look

Cost: $200-$800

3. Workshop Corner

Claim a section of your basement as a dedicated workspace. Even in a raw basement, a workbench and proper lighting transform a corner into a functional shop.

What you need:
– Solid workbench ($200-$500 or build your own)
– Pegboard wall for tools ($30-$80)
– Bright overhead lighting
– Power strip with surge protection
– Rubber floor mat for standing comfort

Cost: $300-$800

4. Kids’ Play Zone

Concrete floors are actually great for kids’ play areas — they’re indestructible. Add some comfort and color and let the kids claim the basement.

  • Interlocking foam floor mats (colorful or neutral) — $1-$2/sq ft
  • Storage cubbies or bins for toys
  • A kid-sized table and chairs
  • Battery-operated string lights for ambiance
  • A rug for the reading corner

Cost: $200-$600

Mid-Level Upgrades (Partial Finishing)

5. Painted Concrete Floor

The single highest-impact upgrade for an unfinished basement. A painted or epoxied concrete floor instantly makes the space feel intentional.

Options:
Concrete paint: $50-$100 for materials (DIY). Lasts 2-3 years with moderate traffic.
Epoxy coating: $3-$7/sq ft professionally applied. Durable, glossy, and available in colors and patterns.
Concrete stain: $2-$4/sq ft. Creates a mottled, organic look. Permanent.

Pro Tip: Prep is everything. The concrete must be clean, dry, and etched (acid-washed) for any coating to adhere properly. Skip the prep and you’ll be peeling it up in six months.

6. Painted Exposed Ceiling (The Industrial Look)

Spray the entire ceiling — joists, pipes, ducts, wires — in flat black or dark charcoal. It’s the fastest way to make an unfinished ceiling look intentional.

Cost: $1-$3/sq ft (or $100-$200 in paint for a DIY approach with a sprayer)

The exposed look works especially well when paired with:
– Edison bulb or industrial pendant lighting
– Concrete or stained floors
– Open shelving and metal furniture

7. Area Rugs Over Concrete

Not ready to commit to flooring? Large area rugs define spaces, add warmth, and make concrete livable.

  • Use rugs with rubber backing (prevents moisture wicking)
  • Layer multiple rugs to define zones (living area, play area, office area)
  • Stick to indoor/outdoor rugs for durability and moisture resistance

Cost: $50-$300 per rug

8. Temporary Wall Partitions

Create separate “rooms” without building permanent walls. Options include:

  • Curtain dividers on ceiling-mounted tracks ($50-$150)
  • Bookshelf walls — tall bookcases placed perpendicular to walls ($100-$300 each)
  • Folding screens — decorative room dividers ($80-$200)
  • Freestanding partition walls — lightweight panels on feet ($100-$400)

Great for separating a workout area from storage, or creating a semi-private office space.

9. Basement Gym

An unfinished basement is actually ideal for a home gym. Concrete floors handle dropped weights, exposed ceilings provide height for overhead lifts, and the temperature stays cool year-round.

Essential setup:
– Rubber gym flooring over concrete ($2-$4/sq ft)
– Wall-mounted mirrors ($50-$200)
– Bright LED lighting
– Adequate electrical for treadmills/equipment
– Fan or portable AC unit for ventilation

Cost: $500-$2,000 (flooring and basics, not counting equipment)

Pro Tip: If you’re planning a serious gym, have an electrician add a dedicated 20-amp circuit for equipment. Treadmills and ellipticals pull serious power, and overloading a shared circuit is a fire risk.

10. Movie/Media Corner

You don’t need a finished home theater to watch movies in the basement. A projector on a blank wall, some beanbags or a couch, and dark-painted ceiling overhead creates a surprisingly great viewing experience.

Setup:
– Projector ($300-$800 for a solid 1080p/4K unit)
– White wall or pull-down screen ($50-$200)
– Bluetooth speaker or soundbar ($100-$300)
– Dark-painted ceiling area above viewing zone
– Comfortable seating (couch, beanbags, floor pillows)

Cost: $500-$1,500

11. Craft and Hobby Room

Dedicate a section to your creative pursuits. Sewing, painting, model building, scrapbooking — whatever your thing is, the basement gives you space to spread out.

  • Large work surface (door on sawhorses works great)
  • Pegboard and shelving for supplies
  • Good task lighting (daylight-spectrum LEDs)
  • Vinyl or tile floor section for easy cleanup

Cost: $200-$600

12. Music Practice Space

Basements are naturally sound-isolated by being underground. Even an unfinished basement is better for loud practice than any room upstairs.

  • Hang moving blankets on walls for basic sound absorption ($20-$40 each)
  • Rubber flooring in the practice area
  • Proper electrical for amps and equipment
  • A full-length mirror for monitoring form (musicians and dancers)

Cost: $200-$500

Bigger Projects (Approaching Full Finish)

13. One Finished Room

You don’t have to finish the whole basement at once. Start with one room — the most impactful one — and leave the rest for later.

Best first room to finish:
Bedroom — Immediate daily use, adds real value, requires egress window
Bathroom — Practical, high-value, enables other finishing later
Family room — The biggest visual and lifestyle impact

Cost: $5,000-$15,000 for a single finished room (depending on size and scope)

Pro Tip: If you finish one room now and plan to do the rest later, we can rough-in plumbing and electrical for future rooms during the first phase. It’s much cheaper to run pipes and wires before drywall goes up.

14. Basement Apartment (Rental Income)

This is the big one. A legal basement apartment in Utah can generate $800-$1,500/month in rental income. That’s $10,000-$18,000 per year that pays for the finishing cost and then some.

Requirements for a legal apartment in most Utah cities:
– Separate entrance
– Kitchen with cooking appliances, sink, and refrigerator
– Bathroom with shower/tub
– Bedroom with egress window
– Smoke and CO detectors
– Fire separation between units (typically 1-hour rated ceiling)
– Minimum ceiling height (usually 7 feet)
– Off-street parking

Cost: $30,000-$60,000 for a full apartment build-out

15. Home Office Suite

More than a desk in a corner — a proper office with walls, a door, lighting, and climate control. Post-pandemic, a dedicated home office is practically a requirement.

  • Framed walls with drywall and a solid-core door
  • Dedicated electrical circuits for equipment
  • Ethernet wiring (Wi-Fi through concrete and joists is unreliable)
  • Good lighting — overhead plus task
  • Small HVAC adjustment for comfort

Cost: $5,000-$12,000

16. Guest Bedroom with Bathroom

A private guest suite makes visiting family comfortable and keeps them out of the family’s daily routine. Requires an egress window for the bedroom.

Cost: $10,000-$25,000

17. Basement Kitchenette

A wet bar or kitchenette doesn’t require the full plumbing of an apartment kitchen. A sink, mini-fridge, microwave, and counter space create a functional entertainment prep area.

Cost: $3,000-$8,000

18. Wine Cellar or Tasting Room

Utah basements are naturally cool — perfect for wine storage. Even a small section of basement can become a proper cellar.

  • Climate-controlled if storing wine long-term (cooling unit: $500-$2,000)
  • Racking systems ($200-$2,000 depending on size)
  • Stone or brick accent wall for character
  • Proper lighting (LED, not heat-generating incandescent)

Cost: $2,000-$15,000 (simple rack room to full tasting room)

19. Indoor Garden / Grow Room

Utah’s short growing season makes indoor gardens appealing. Basements offer consistent temperatures and isolation from pests.

  • Grow lights (LED panels: $100-$500)
  • Shelving with waterproof trays
  • Adequate ventilation
  • Timer-controlled lighting
  • Waterproof flooring in the grow area

Cost: $300-$2,000

20. Pet Suite

Dedicated space for your pets — dog washing station, feeding area, pet bed zone, litter box room for cats.

  • Dog wash station with handheld sprayer ($500-$2,000 installed)
  • Waterproof flooring (tile or LVP)
  • Proper drainage
  • Easy-clean walls (tile or FRP panels)

Cost: $500-$3,000

21. Seasonal Gear Room

In Utah, we have gear for every season — ski equipment, camping gear, fishing tackle, hunting equipment, mountain bikes, golf clubs. A dedicated gear room with proper storage beats a cluttered garage.

  • Wall-mounted bike hooks and ski racks
  • Ventilated boot dryers
  • Labeled bins for seasonal rotation
  • Dehumidifier to prevent mildew on gear

Cost: $500-$2,000

22. The Staged Approach

Here’s the smart play: phase your basement finish over time. Start with the highest-impact areas, get value from them immediately, and expand as budget allows.

Phase 1 (Month 1-3): Paint the floor, paint the ceiling, add lighting. ~$1,000-$3,000
Phase 2 (Month 6-12): Finish one room (bedroom or family room). ~$8,000-$15,000
Phase 3 (Year 2): Add bathroom. ~$5,000-$12,000
Phase 4 (Year 3): Complete the remaining space. ~$15,000-$30,000

Pro Tip: If you know you’ll eventually finish the whole basement, talk to us before starting Phase 1. We can advise on what to do now that will save money later — like running electrical conduit before you paint the ceiling, or stubbing plumbing before you coat the floor.


Before You Start: The Moisture Check

No matter which idea you pursue, check for moisture first. Tape a 2×2 foot piece of plastic sheeting to the concrete floor and walls. Leave it for 48-72 hours. If moisture collects under the plastic, you have a vapor issue that needs addressing before you invest in any improvements.

Common moisture solutions:
Dehumidifier for mild humidity ($200-$400)
Interior waterproofing paint for minor seepage ($50-$100/gallon)
French drain system for active water intrusion ($3,000-$8,000)
Exterior waterproofing for serious foundation moisture ($5,000-$15,000)

Let’s Talk About Your Basement

Whether you’re looking for a quick weekend upgrade or a full basement transformation, Utah Basement Finishing can help. We offer free estimates and honest advice — even if the right answer is “start with these three things and call us in a year.”

801-515-3473 or request a free estimate.

Ready to Start Your Basement Project?

Get a free, no-obligation quote from Utah’s trusted basement finishing experts.

Get Free Quote

Written by

Korey Farr

Owner & Lead Contractor · 20+ Years Experience

Owner of SALT LLC and founder of Utah Basement Finishing. With over 20 years of basement finishing and remodeling experience across the Wasatch Front, Korey has personally overseen 500+ basement transformations. Licensed, bonded, and insured — Korey and his team deliver premium craftsmanship on every project.

View all articles →

Source

Disclaimer: all images are owned and copyright by their respective owners and website (utbasementfinishing.com) and “https://madcitybasement.com/blog” is for news, information, product news and reviews.

Sandhills Manufacturing Edmonton Company Online Review & Ratings

Services Offered Stairs:
– Construction-grade interior and exterior stairs
– Finished grade interior stairs
– Curved stairs
– Stair refacing services, including hardwood treads

Rails:
– Supply and Install of interior wood railings
– Installation of Stainless Steel and glass railings
– Temporary Safety Rails
– Modifications to older railings
– Stain/Lacquer services completed by our professional finishing partners

More:
– Supply and manufacture of custom hardwood mouldings, including baseboard, casing, crown mould, nosings, and panel moulds
– Sale and milling of live-edge slabs
– Custom millwork

Company Description


Edmonton’s Trusted and Experienced Stairs and Railings Manufacturer and Installer

Sandhill Manufacturing has been serving the Edmonton area since 1979, providing high-quality stairs and railings for residential and commercial projects. With decades of experience, the company has built a strong reputation for reliable service, skilled workmanship, and durable products. Their team focuses on delivering practical solutions that meet both structural needs and design goals.

The company specializes in a wide range of stair systems, including construction-grade interior and exterior stairs, finished-grade stairs, curved designs, and stair refacing. Everything is manufactured and supplied locally. Whether it’s a functional basement staircase or a feature stair for a new home, Sandhill Manufacturing works closely with clients to ensure the final result fits the space and customer expectations.

In addition to stairs, Sandhill Manufacturing supplies and installs a variety of railing systems. These include interior wood railings, stainless steel and glass options, temporary safety rails for job sites, and modifications to existing railings. Sandhill Manufacturing works with finishing partners to complete staining and lacquer services, helping clients achieve a clean, polished look.

Sandhill Manufacturing also offers custom millwork, including hardwood mouldings, live-edge slabs, and specialty wood products. With a skilled team, quality materials, and a strong focus on customer service, they remain a trusted choice for stair and railing projects across Edmonton.

Contact them to discuss your next project!

Source

Disclaimer: all images are owned and copyright by their respective owners and website (blog.renovationfind.com) and “https://madcitybasement.com/blog” is for news, information, product news and reviews.

0
Back to Top

Search For Products

Product has been added to your cart