The Soundproofing Expert Toronto Company Online Review & Ratings

Company Description


Providing soundproofing and acoustic solutions for over 10 years in the GTA.

Reliable Connections Inc., operating as The Soundproofing Expert since 2015, began as a contractor referral service in 2003. Over time, the company shifted into a specialized, engineering-driven consultancy focused entirely on acoustics and soundproofing. This evolution built a strong reputation for technical precision, applying the depth and discipline of a Master’s thesis to real-world projects, including the highly architectural complex and remote Fogo Island Inn.

The company’s core value lies in connecting architectural design with real-world acoustics. They help clients avoid expensive fixes caused by incomplete or misleading “free” contractor quotes.

The Soundproofing Expert provides independent soundproofing advice and acoustic consulting for both residential and commercial spaces. Their work includes home theatres, condominiums, offices, and other noise-sensitive environments. Services range from free phone or email consultations with a professional acoustic engineer (P.Eng.) to on-site assessments, noise investigations, construction drawing reviews, and before-and-after sound testing. They also inspect projects during construction to ensure soundproofing is installed correctly.

The company is led by President Ivan Koval, M.A.Sc., P.Eng., who brings many years of hands-on experience in acoustics, sound reproduction, telephony, architectural acoustics, construction, and project management. Every project follows a clear, evidence-based process. First, client needs are defined. Then, proven sound-rated assemblies are selected using lab-tested data. Flanking noise is addressed in accordance with guidance from the National Research Council of Canada, and construction quality is verified on site. As independent consultants, the firm works solely in the client’s best interest.

Serving Toronto, the Greater Toronto Area, and Southern Ontario, The Soundproofing Expert also operates the Soundproofing Calculator website, a technical resource for acoustics information and references. The company provides noise testing, remediation, and environmental noise assessments and maintains strong professional credentials.

For more information, visit their website or call to set up a consultation.

Source

Disclaimer: all images are owned and copyright by their respective owners and website (blog.renovationfind.com) and “https://madcitybasement.com/blog” is for news, information, product news and reviews.

Affordable Basement Renovation Ideas You’ll Love

You’ve got square footage hiding in plain sight. Utah basements are like bonus rooms waiting for a plan, a little grit, and a smart budget. If you’re in Salt Lake County, Davis County, or Utah County and you want a space that’s warm, dry, and welcoming—without blowing savings—this guide is for you. We’ll walk through affordable basement renovation ideas that look sharp, feel comfortable, and make every dollar work hard. You know what? You don’t need marble, you need a plan.


Why basements make good money in Utah (and make life easier)

Basements along the Wasatch Front pull double duty. They buffer temperature swings, add living space for growing families, and—done right—boost resale. The twist? You can finish a basement on a budget and still have it feel rich.

Here’s the thing: most of your Cost goes into what you don’t see—framing, insulation, electrical, plumbing. That sounds boring. Yet that’s exactly what makes the space feel warm, quiet, and solid. Spend smart there, then save on finishes. It’s a little contradictory, but it works.

Another local perk: Utah’s dry climate helps, but basements still need moisture planning. A dry shell plus simple, durable finishes equals a space you’ll actually love to use through ski season, soccer season, and everything in between.


Start with the bones: moisture, insulation, and code basics

Before paint colors and sofas, lock down the essentials. A great remodel sits on a healthy foundation.

  • Moisture control: Check gutters and grading outside; seal cracks; use rigid foam or closed-cell spray foam against concrete. Skip plastic sheeting that can trap condensation behind drywall.
  • Insulation for our climate zone: Along the Wasatch Front, you’re typically in Climate Zone 5. For basement walls, aim for R-10 continuous foam or R-13 cavity insulation. It keeps rooms warm without roasting the budget.
  • Egress and safety: Sleeping rooms need an egress window. Common code targets include a net clear opening of 5.7 sq. ft. (5.0 if at grade), minimum 24-inch height and 20-inch width, with the sill no higher than 44 inches off the floor. Always confirm with your city building department.
  • Permits and inspections: Electrical, plumbing, and new walls generally require permits in Salt Lake, Davis, and Utah Counties. Permits protect you and help during resale.

Once the bones are right—warm, dry, and welcoming—the fun stuff finally sticks.


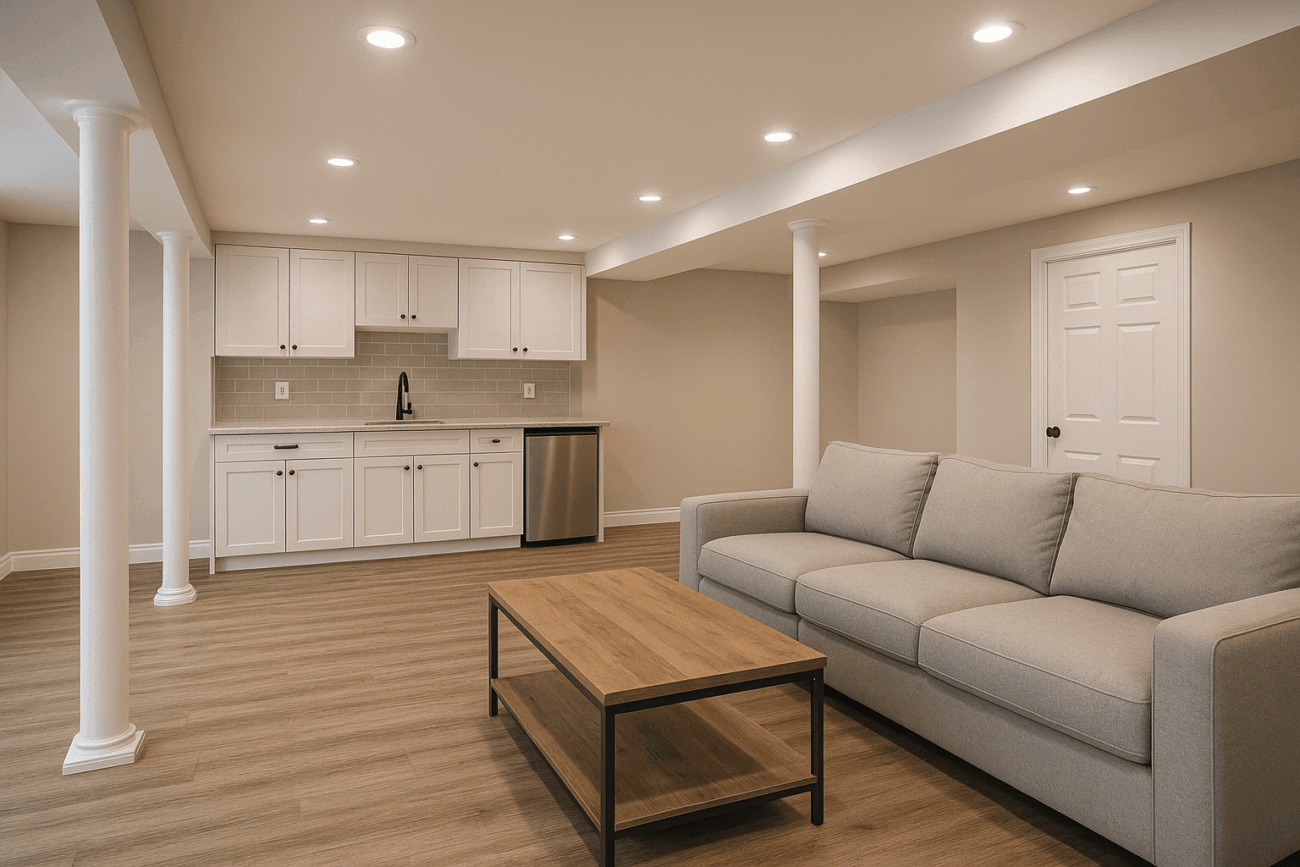
Layouts that stretch your budget

Open plans save money. Fewer walls, fewer doors, fewer headaches. But an open box can still function like three rooms if you plan the zones. Think media, play, and gym—or guest space, office, and craft corner.

Simple zoning tricks that cost almost nothing

Float a sofa to mark the TV zone. Use a rug to define a play area. Hang a curtain to hide a treadmill. Switch the lighting by area—bright in the craft corner, soft near the sectional. Low-cost, high-impact. And if you’ve got a Jazz game going and a homework crunch at the same time, each spot still feels “right.”


Finishes that look high-end (and aren’t)

You can make budget materials feel custom with smart choices and good installation. Let me explain.

Flooring: Luxury vinyl plank (LVP) is a hero in basements—tough, waterproof, and friendly on price. Painted concrete with a matte sealer is another sleeper hit for Game Rooms. Want something soft? Carpet tiles in the TV zone make easy work of spills.

Ceilings: If you need access to ducts and plumbing, consider a modern drop ceiling with slim grid and large, smooth tiles. Drywall the main areas for that clean finish, and keep the grid in the mechanical zone. It’s a budget-balancing act that actually looks great.

Walls: Drywall is the standard. But you can add character—fast—with plywood wainscoting, thin shiplap, or a single accent wall in a deep, calm shade. Brands like Sherwin-Williams Duration Home hold up to kid traffic and the occasional ping-pong ding.

Trim and doors: Use simple, square-edge trim and paint it the same color as the walls for a seamless, modern look. It saves time, and it reads expensive. Slab doors with black or brushed-nickel levers finish the look without the fancy price tag.

Budget tip: Buy materials during spring or fall promos at Home Depot or Lowe’s. A few percent off across flooring, paint, and lighting adds up fast.


Affordable lighting that changes everything

Lighting shapes mood. It also hides sins—like that one corner with the storage totes. A simple, layered setup can make a basement feel finished before the couch even arrives.

Use wafer LED downlights for general lighting. They’re low-profile, easy to install, and inexpensive. Then add floor lamps and a couple of sconces for warmth. Stick with 3000K for cozy, 4000K for bright task zones. And yes, put it all on dimmers; Lutron Diva dimmers are reliable and easy to find.

Lighting type Approx. cost Where it shines
Wafer LED downlights $12–$25 each General lighting across big areas
Wall sconces $35–$90 each Media walls; stair landings
Lamps + smart bulbs $20–$60 Reading nooks; flexible mood lighting

One more trick: put accent lighting on a different switch. When the movie starts, click—instant theater feel.


Storage that tames the chaos

Basements collect stuff—skis, camping bins, canning jars, hand-me-downs. Create a home for it and your living area stays clean.

Under the Stairs, build cubbies for boots, helmets, and seasonal gear. Along a back wall, add a 16–20 inch-deep platform with cabinet doors or IKEA frames. It reads like custom built-ins but costs a fraction. Pegboard near the workshop corner keeps tools off the floor and out of harm’s way. A tidy basement feels bigger, and it is—because you can actually use it.


Smart bathroom and laundry adds that don’t wreck the budget

You don’t always need a full bath. A powder room and a simple wet bar can stretch your spend while still meeting daily needs. Place plumbing close to existing stacks and mechanicals to cut costs. Shorter runs equal smaller bills.

Go with a prefabricated shower pan instead of custom tile, then add a single showstopper—like a niche with patterned tile. For tricky layouts, a macerating up-flush toilet (Saniflo is a common brand) can save on concrete cuts. It’s not glamorous, but it’s clever and cost-effective.

Laundry? Stackable units behind a pocket door are quiet and compact. Add a counter right over them for folding space and a neat look.


Budget-friendly sound control

Noise finds every crack. Stop it early with small moves that matter.

Use mineral wool like Rockwool Safe’n’Sound in ceilings and around bathroom walls. Consider resilient channel where you need extra quiet—like under the kids’ Bedrooms. Add a solid-core door at the theater room and it suddenly feels like you splurged. White noise machines finish the job when movie night gets lively.


DIY, hybrid, or hire it out? Spend where it pays

Not everything needs a pro, but some parts really do. A good mix keeps the budget friendly and the results safe.

Task Good to DIY Better with a pro
Framing + drywall Framing small partitions; sanding, priming Full drywall hang/finish for speed and flat seams
Electrical Fixture swaps after rough-in Rough wiring, new circuits, panel work
Plumbing Faucet or vanity installs New drains, venting, showers, gas lines
Flooring LVP, carpet tiles Stairs, complex transitions

Permits matter here. We pull permits in Salt Lake, Davis, and Utah Counties all the time, and inspections go smoother when the work is clean and code-honoring.


Seasonal touches and local trends

Utah living swings from snow boots to sandals. Your basement can flex with it.

In winter, a sleek electric fireplace under the TV adds instant cozy. In summer, a cool, LVP-floored game space becomes the neighborhood hangout. If you love the Utes, Cougars, or Jazz, add a subtle nod—a framed jersey or a color-block wall behind the bar. It’s personal, not cheesy.

Paint trends along the Wasatch: warm whites, earthy greens, deep navy accents. They make basements feel calm and finished. And if you’re chasing airy, go one shade lighter downstairs than you’d use upstairs; less natural light means color reads darker.


A sample budget for a 700 sq. ft. basement in Salt Lake County

Every plan is different, but here’s a ballpark for a practical, good-looking finish. Not bare-bones, not lavish—just right.

  • Framing and insulation: $3,500–$6,500
  • Electrical (wafer lights, switches, a few circuits): $2,200–$4,500
  • HVAC adjustments and vents: $1,200–$2,800
  • Drywall + finish: $4,000–$7,000
  • Flooring (LVP with a carpet tile zone): $2,000–$4,000
  • Doors, trim, paint: $1,800–$3,500
  • Bathroom (powder or basic 3/4 bath): $4,500–$10,000
  • Ceiling (drywall + small access grid): $2,000–$4,200

Total range: roughly $21,200–$42,500, depending on the bath, finishes, and How Much you DIY. A clean plan, mid-grade materials, and a focused scope keep you near the lower half while still looking sharp.


Little luxuries that feel big

Sprinkle a few “wow” pieces and the whole room levels up.

Hang a barn door at the office nook. Wrap one column with simple wood and add a ledge. Paint a single moody wall behind the TV and run a slim LED strip for glow. Add a smart thermostat sensor downstairs so the space stays comfy when you’re using it. Small moves, big feel.


Common mistakes you can skip

We see patterns, and they’re easy to avoid.

  • Too many tiny rooms: They shrink the space and raise costs. Keep it open, zone it smart.
  • Ignoring egress: Bedrooms need it. Safety first; resale second. Both matter.
  • Low-hanging lights/fans: Basements run shorter. Choose flush-mounts and low-profile fixtures.
  • No future planning: Pre-wire for speakers or add blocking for a future barn door. Cheap now, pricey later.
  • Skipping sound control: A little insulation saves a lot of Saturday naps upstairs.

Style moves that don’t break the bank

You can be creative on a budget. In fact, constraints usually sharpen the design.

Try a built-in bench with storage under a garden-level window and dress it with cushions. Use picture ledges for a rotating art wall—kids’ drawings, concert posters, ski maps. In the bar area, one slab of butcher block and a simple bracket shelf read custom, yet it’s all off-the-shelf. Whisper it: that’s the fun part.


We focus on the right sequence, the right materials, and clean execution. We value-engineer every basement we touch—meaning we find savings that don’t cost you comfort or style. Our team knows city requirements across Salt Lake County, Davis County, and Utah County, so permits and inspections move smoothly.

Our process is simple. We listen, we sketch, we price in clear phases, and we help you choose where to save and where to invest. The result is a space that feels personal and polished—without extra fluff weighing down the budget.


Ready for the fun part?

Honestly, your basement doesn’t need to be fancy. It needs to be warm, dry, welcoming—and yours. If you want Utah basement Finishing that respects your budget and your taste, we’re here to help with smart, budget basement ideas and real-world build experience across the Wasatch Front.

Call us at 801-515-3473 or tap Request a Free Quote to get started. We’ll help you shape a clear plan, a fair price, and a timeline that makes sense. Your basement can be the best room in the house—let’s make it happen.

Source

Disclaimer: all images are owned and copyright by their respective owners and website (utbasementfinishing.com) and “https://madcitybasement.com/blog” is for news, information, product news and reviews.

The 5 Best Home Security Companies in Edmonton

How We Found the Best Home Security Companies in Edmonton

To find the best home security companies in Edmonton, we started with our own RenovationFind Certified companies. Those certified companies go through a thorough legal and financial background check. We also require proof of each company’s liability insurance, business licensing, industry certifications, and WCB coverage to ensure homeowners are in good hands. Plus, RenovationFind uses a third-party monitoring company to ensure that every company holding our certification continually meets our high standards.

RenovationFind will then compare each home security company’s overall value and customer experience. We found home security specialists who offer the fairest pricing, clearest estimates, and the most practical solutions for both residential and commercial projects. Expertise was the next part of our search, especially for companies that deal with home safety, security, camera monitoring, and home alarms.

Next, we focused on companies known for clear communication, honesty and transparency. We wanted to find companies that would walk clients through the complex world of home security, simplify concepts, and explain product options. This also includes companies that take time to help customers learn their security systems with support, guidance, and a willingness to answer questions. Finally, we reviewed the range of services and security systems each company offers to ensure they are properly trained, equipped, and knowledgeable enough to keep your family safe at home.

Using this careful process, we identified Edmonton’s top home security companies based on the quality of their installations, the level of customer care, and reputation of trust and dependability.

In no particular order, here are the best options for home security companies in Edmonton.

1. Telsco Security

Website: https://telsco.com/

Address: 12750 127 St, Edmonton, AB T5L 1A5

Contact Details: (780) 424-6971

Years in Business: 56 years

Business Hours:

Sunday  24-hours
Monday  24-hours
Tuesday  24-hours
Wednesday  24-hours
Thursday  24-hours
Friday  24-hours
Saturday  24-hours

Telsco is one of the most successful and longest-standing home security companies in Edmonton. With over 50 years of experience serving Edmontonians, their team has the expertise to provide custom security solutions to meet a range of needs.  Telsco gets homeowners started with a free security consultation, where they get to know you, your home, and your security or automation needs. Telsco has award-winning customer service and a Five Diamond Monitoring Station designation, providing homeowners with the ultimate peace of mind regarding installation, backup, technical support, and future upgrades.

The whole-home security system from Telsco, or the “Home Intrusion Detection and Alarm Systems,” is a comprehensive package. Along with the standard cameras and monitoring, Telsco also includes features such as smart door locks, video door bells, glass break detectors, infrared motion detectors, and outdoor cameras that easily withstand Edmonton weather. They monitor your alarm for alerts from their local, Edmonton-based call centre. With Telsco, you and your home are in good hands.

Key Services & Features

  • Business and home security systems
  • Whole-home security systems
  • Security and monitoring products: cameras, motion detectors, smart doorbells, or window and perimeter security products
  • Customized home security systems
  • Medical alert systems
  • Average alarm response time of 33 seconds
  • Free consultations
  • Local Edmonton monitoring station with a Five Diamond Designation from The Monitoring Station Association

Customer Feedback

Switching to Telsco was the right choice for us. The whole process was fantastic, starting with a consultation with Teresa, their security specialist. She was incredibly knowledgeable, outgoing, and friendly, and she explained all of our options without being pushy. The installation was quick and easy, and the two technicians were very professional. We’re so happy with our new security system!

– Veronica, Google

2. Shore 2 Shore Automation Ltd.

Website: https://shore2shore.ca/

Address: 1047 Ormsby Crescent NW, Edmonton, AB T5T 6H5

Contact Details: (780) 705-8105

Years in Business: 22

Business Hours:

Sunday Closed
Monday 9 a.m.–5 p.m.
Tuesday 9 a.m.–5 p.m.
Wednesday 9 a.m.–5 p.m.
Thursday 9 a.m.–5 p.m.
Friday 9 a.m.–5 p.m.
Saturday Closed

To offer its customers the best in-home security products and services, Shore 2 Shore Automation Ltd. partners with top brands and suppliers in the industry. Shore 2 Shore Automation is a full-service home automation company with a commercial branch and is well-established in the Edmonton area. They are fully committed to home comfort and security, integrating all smart home technology into a single, seamless system. When it comes to surveillance, cameras, and monitoring, Shore 2 Shore will ensure you have the products and services you need for complete peace of mind.

For over 20 years, Shore 2 Shore has built a positive reputation for professionalism and exceptional customer service. For projects large and small, Shore 2 Shore Automation puts its customers first with individualized solutions, close attention to each stage of the automation process, and a commitment to building lasting relationships. Contact them to day to talk about your home security needs.

Key Services & Features

  • Business and home security systems
  • Whole-home automation systems that integrate security systems and features
  • Hard-wired or wireless security systems using ELK brand security and monitoring products
  • Installations for security cameras, intercom systems, and access control systems
  • Carry security cameras from top brands like Panasonic
  • Smart lighting installations
  • Local and family-owned Edmonton security company

Customer Feedback

When building our custom home we were a bit hesitant about finding the right company to meet our home automation & security needs. Our builder recommended Shore to Shore & we are so glad he did. We have experience with other systems and can honestly say Shore to Shore is the best. Right from the start & continuing 3 yrs later their customer service is top shelf. Extremely responsive to all needs at anytime. We are more than satisfied….thrilled with the Shore to Shore team!

– D & K, Google


3. Liberty Security Systems

Website: https://libertysecurity.ca/

Address:  5640 104 St NW Edmonton, AB T6H 2K2

Contact Details: 1-866-926-7233

Years in Business: 19 years

Business Hours:

Sunday Closed
Monday 8 a.m.–4:30 p.m.
Tuesday 8 a.m.–4 p.m.
Wednesday 8 a.m.–4 p.m.
Thursday 8 a.m.–4 p.m.
Friday 8 a.m.–4 p.m.
Saturday Closed

While Liberty Security offer their services across Canada, the home security company was founded in Edmonton and remains locally based. Celebrate this local success by considering them for your home security system, security cameras, or medical alert needs. In addition to their years of success, Liberty Security is an easy choice for home security in Edmonton thanks to their multiple service awards, over 1,000 5-star reviews, and their dedication to the community. Liberty has partnered with and supported over a dozen Canadian charities!

Liberty Security believes that homes are our castles that should be properly protected. Their team of experts is here to protect you and yours from hazards such as weather events, home intrusion or theft, toxic air, and more, while providing overall peace of mind. Additionally, Liberty Security is committed to protecting everyone in the home, including sick, elderly, or vulnerable family members, and offers medical alert services. Visit their website to learn more.

Key Services & Features

  • A GardaWorld Company
  • Over 1,100 five-star reviews on Google
  • Named one of Profit 500’s Fastest Growing Companies
  • Security for businesses and homes
  • Operate their own monitoring station for Canadian customers
  • Install alarms for smoke, fire, carbon monoxide, water damage, and extreme temperatures
  • Medical alert services like Liberty Alert and Liberty Alert Mobile
  • Offer installations for whole-home systems or individual cameras

Customer Feedback

We contacted Liberty Security following issues with our previous security provider. Within two weeks (at our convenience) of contacting them, we had met with a sales rep, received a quote and had a new, state of the art system installed.

The entire experience, from initial visit to installation, was without any issues. Brock was of great assistance in evaluating our needs without pressuring us into anything devices we did not require. We were able to reuse most of our old systems sensors, so bonus points for cost savings.

– Patrick, Google


4. JTL Security

Website:https://www.jtlsecurity.ca/

Address: 7513 67 St NW, Edmonton, AB T6B 3J8

Contact Details: (780) 328-3232

Years in Business: 18 years

Business Hours:

Sunday Closed
Monday 8:30 a.m.–4:30 p.m.
Tuesday 8:30 a.m.–4:30 p.m.
Wednesday 8:30 a.m.–4:30 p.m.
Thursday 8:30 a.m.–4:30 p.m.
Friday 8:30 a.m.–4:30 p.m.
Saturday Closed

JTL Security provides home and business security solutions to customers across the Edmonton area, including smaller cities such as Leduc, St. Albert, and Sherwood Park. Homeowners and business owners in the Capital Region have trusted JTL Security for over 15 years with professional installations, 24/7 monitoring, top-quality security products, and the support of a team located here in Edmonton.  The JTL slogan, “from safety to freedom,” encompasses their entire business philosophy. The JTL team wants to provide you and your loved ones with the safest environment possible so you can save time, save money, and reduce worry.

With the latest in smart home security technologies, a variety of pricing and payment plans, and a convenient app for security controls, JTL Security stands out as a top choice for home security in Edmonton. This is accompanied by a firm dedication to integrity and professionalism across all parts of their business. Contact them to learn more!

Key Services & Features

  • Security systems for homes and businesses
  • Monitoring services with a local monitoring station
  • Provide free security consultations
  • Install alarms for smoke, fire, carbon monoxide, water damage, and extreme temperatures
  • Alarm systems with anti-tamper technology

Customer Feedback

I needed a new alarm system and got quotes from several alarm providers before deciding to go with JTL, and I’m glad I did! Dolby came over the same day I called and looked at what I had, and we discussed a path forward. The best part is he didn’t re-invent my system, he just replaced what was outdated and re-connected what was still functional, and even let me get a thermostat I wanted and incorporated in. Their installer John is a very personable and knowledgeable guy who was very careful to make sure everything was installed properly and was to my satisfaction before leaving. I’ve had my new system for a month now and would highly recommend JTL to anyone.

Scott, Google


RenovationFind CertifiedRenovationFind Certified

Get 3 Free Estimates Today

Post your project and we will connect you with RenovationFind Certified Companies.


5. Central Protection

Website: https://www.centralprotection.ca/

Address: 9182 34a Ave NW, Edmonton, AB T6E 5P4

Contact Details: 587-401-3838

Years in Business: 11 years

Business Hours:

Sunday 24-hours
Monday 24-hours
Tuesday 24-hours
Wednesday 24-hours
Thursday 24-hours
Friday 24-hours
Saturday 24-hours

The services available from Central Protection Services in Edmonton include home security, commercial security and guard services. Central Protection offers camera installations, security guard services and training, fingerprint and DNA testing, First Aid and CPR training, and private investigation services. So while Central Protection Services specializes in the bigger picture of security and safety, they are still a top choice for home security in Edmonton. They offer a selection of camera types, a local monitoring station, access control installations, and home alarm systems.

Central Protection Services is consistently praised in online reviews for its professionalism, customer service, and employees’ attitudes. When you choose Central Protection for home security, you’ll find friendly customer care and installation professionals, a helpful attitude, and many home security options. Check out their website for more information on their services.

Key Services & Features

  • Member of the Canadian Council of Aboriginal Business
  • Security camera and monitoring solutions
  • Services available in Edmonton, Alberta, and Toronto, Ontario
  • Home alarm systems
  • Security guard services for temporary or permanent needs
  • CCTV rentals

Customer Feedback

I just want to say how impressed I am with Central Protection Services! Your team is absolutely amazing — professional, reliable, and truly dedicated to what they do. You can really see the discipline and hard work in every member of the team. I’ve never felt more safe and confident knowing such a strong and respectful group is in charge. Honestly, I love everything about your service — your commitment, your attitude, and the way you handle every situation with calm and control. You guys are doing an excellent job, and I truly admire your efforts. Keep it up!

– Haifa, Google


Home security systems FAQ

A new home security system might come with a few questions. Here are a few FAQs to get your journey started.

1. What types of home security systems are available?

Most home security companies offer a range of systems, including monitored and unmonitored options. Systems may include door and window sensors, motion detectors, security cameras, video doorbells, smart locks, and alarm panels. Many modern systems also integrate with smart home technology for added convenience and control.

2. Do I need professional monitoring, or can I monitor the system myself?

Professional monitoring provides 24/7 oversight, meaning a monitoring centre responds and contacts emergency services if an alarm is triggered. Self-monitoring allows you to receive alerts on your smartphone and respond yourself. The right choice depends on your budget, lifestyle, and the level of peace of mind you want.

3. How much does a home security system cost?

Costs vary based on your home’s size, the equipment you select, and whether you choose professional monitoring. Some companies offer upfront equipment purchases, while others provide financing or monthly subscription plans. It’s important to ask about installation and monitoring fees, as well as any long-term contracts.

4. Can a security system be customized for my home?

Yes. Reputable security companies assess your property layout, entry points, and specific concerns before recommending equipment. Systems can be tailored to include indoor and outdoor cameras, garage monitoring, smart lighting integration, and more.

5. Will a home security system lower my insurance premiums?

In many cases, yes. Insurance providers often offer discounts for homes equipped with monitored alarm systems because they reduce the risk of theft and property damage. Check with your insurance company to confirm what documentation or certification is required.

Source

Disclaimer: all images are owned and copyright by their respective owners and website (blog.renovationfind.com) and “https://madcitybasement.com/blog” is for news, information, product news and reviews.

Step-by-Step Guide to Basement Wall Finishing

You’re staring at those concrete basement walls, imagining movie nights, a guest suite, maybe a playroom that actually contains the chaos. Good news: Finishing basement walls isn’t mysterious, but it is a sequence—one step setting up the next. Do it right, and your space feels warm, dry, and quiet. Do it wrong, and you fight cold corners and musty smells. Let’s walk through a clear, Utah-friendly guide to basement wall finishing that helps homeowners in Salt Lake County, Davis County, and Utah County get it done with confidence.


Who this guide is for—and why your Utah basement is its own animal

If you’re a homeowner along the Wasatch Front thinking about basement finishing or a remodel, this is for you. Our climate swings—cold, dry winters; warm summers—plus occasional groundwater surprises mean your walls need a system that manages moisture and keeps heat where it belongs. You want comfortable rooms, low energy bills, and zero mildew drama. That’s the aim here.

We’ll cover the practical stuff in a friendly way: simple planning, the right materials, and a step-by-step sequence you can follow. You know what? A few smart choices up front save a pile of patchwork later.


Step 1: Plan the walls, not just the room

It sounds obvious, but great basements start with a quick drawing that shows walls, doors, utilities, and furniture. Your wall layout decides how electrical circuits run, where plumbing can go, and whether your home theater sounds crisp or echoey. Sketch on graph paper or use a simple app like RoomSketcher or Magicplan.

Key planning moves:

  • Measure the slab and foundation so you can account for any bumps, jogs, or columns.
  • Note mechanicals—furnace, water heater, main drain, shutoff valves. You’ll want service access.
  • Plan traffic flow so doors swing clean, hallways feel open, and furniture fits.
  • Decide the “quiet zone” (office, Bedrooms) and the “loud zone” (rec room) for smart sound control.

Permits? Yes, most projects in Salt Lake, Davis, and Utah Counties require them. You’ll likely have inspections for framing, electrical, plumbing, and insulation. It’s not a hassle—it’s protection and future resale value.


Step 2: Tackle moisture and radon before you build

Here’s the thing: concrete is porous. It can wick moisture even without a leak. If you finish over a damp wall, you trap water and invite mold. That’s why prep matters.

  • Check for damp spots after a rain or snowmelt. Any white powdery residue (efflorescence)? Deal with gutter downspouts, grading, or patch cracks first.
  • Add a capillary break between concrete and wood. Use sill sealer foam under the treated bottom plate.
  • Consider radon. Utah sees elevated levels. A quick test kit is cheap and smart. If you’re high, talk to a pro about mitigation before finishing.

Light waterproofing paints can help with dusting or minor seepage, but they’re not fixes for actual water entry. If you’ve got persistent water, solve that at the source—exterior drainage or interior drain tile—then move forward.


Step 3: Choose insulation that actually works here

Insulation isn’t just about R-value. In basements, you also want materials that won’t soak up moisture and go soft. Below are solid options we use around the Wasatch Front.

Insulation Type Typical R-Value per Inch Why it’s good (and when it’s not)
Rigid foam (XPS or EPS), e.g., Foamular R-4.2 to R-5 Excellent against concrete; helps with moisture; tape seams. Needs fire barrier (drywall). Don’t leave gaps.
Closed-cell spray foam R-6 to R-7 Air + vapor control in one. Great in tight spots. Costs more; must be installed carefully by a pro.
Mineral wool batts (ROCKWOOL ComfortBatt) R-4.2 Moisture-tolerant; great sound control inside studs. Best when paired with foam against the concrete first.

Local energy codes often aim for around R-10 continuous foam or R-13 cavity for below-grade walls. Requirements vary by city, so always check with your building department. Our rule of thumb: a thin layer of rigid foam against concrete (thermal break + moisture control), then stud framing with batt insulation. Comfortable, durable, budget-wise.


Step 4: Frame it square, frame it smart

This is where your walls take shape. If the concrete isn’t perfectly plumb, the framing hides it—but your lines still need to be straight.

  • Bottom plate: Use pressure-treated lumber. Lay sill sealer foam under it as a capillary break. Anchor with Tapcon screws or a powder-actuated fastener (Ramset).
  • Top plate: Fasten to joists or blocking; keep lines straight with a chalk snap and a laser if you have one.
  • Stud spacing: 16 inches on center is standard; 24 is possible for non-load-bearing partitions with the right drywall and use case, but 16 inches keeps drywall crisp.
  • Spacing from concrete: Leave a small gap (about 1 inch) if foam isn’t on the wall; you don’t want wood touching concrete.
  • Fire blocking: Required at top plates and interconnections with hidden spaces. Don’t skip it—inspectors look.

Small contradiction time: some people say “push studs tight to foam; others prefer a hair of space.” We like tight to foam for thermal performance, as long as the foam is continuous and seams are taped. It reduces cold spots.


Step 5: Rough-in electrical, low-voltage, and plumbing

Your walls are open, so now’s the moment. Think comfort and convenience: outlets where you’ll plug in lamps, a switched outlet for a tree during the holidays, USB-C charging near the couch, even conduit for a future projector.

  • Electrical: Follow NEC spacing for outlets—generally every 12 feet and within 6 feet of a door opening. Use GFCI/AFCI where required. Basement bedrooms need smoke/CO detectors.
  • Low-voltage: Prewire for Wi-Fi access points, TV, speakers, and security. Run Cat6 and leave pull strings in bigger chases.
  • Plumbing: If adding a wet bar or bath, plan venting and slope. Verify you’ve got the right drains, especially for below-slab connections.

Tip from the field: label everything. A strip of painter’s tape and a Sharpie save future-you a lot of guessing.


Step 6: Vapor control and sound—it’s comfort season

Basements need moisture-smart layers. In our region, a smart vapor retarder such as CertainTeed MemBrain over the studs allows drying in both directions depending on humidity. Old-school poly can trap moisture; we avoid it unless code explicitly calls for it and conditions are right.

Sound control is worth it, too—especially between family zones and sleep zones. Use mineral wool in interior walls and resilient channel on ceilings by the theater or under bedrooms. The difference is real.


Step 7: Drywall choices, hanging layout, and clean seams

Most walls get standard 1/2-inch drywall; moisture-resistant boards (often called “green board”) are fine in areas near Bathrooms but not meant for wet zones like shower stalls. In basements, we like screws every 12 to 16 inches and glue on studs for fewer pops. Stagger seams, keep factory edges together when possible, and leave a small gap at the floor to avoid wicking.

Taping and mudding is an art. Three coats, each wider and lighter; sand between coats with a vacuum sander if you can. Bright work lights help catch ridges. And yes, patience here saves hours later when paint reveals everything.


Step 8: Prime, paint, trim—and the “feel” of the room

Once joints are smooth, primer locks in consistency so paint goes on true. A quality primer matters more than people think. For paint, warm neutrals soften concrete vibes and balance LED light. Semi-gloss trim, eggshell or satin walls—easy to clean, easy to love.

Finish carpentry brings it together:

  • Baseboards hide floor gaps and frame the room.
  • Casing around doors/Windows sharpens lines.
  • Built-ins add storage without feeling bulky; scribe to imperfect walls for that “custom” look.

Honestly, this is the moment your basement stops feeling like a project and starts feeling like part of your home.


Special Utah notes: egress windows, cold corners, and concrete quirks

If a room can be slept in, it needs an egress window by code. That means size and ladder requirements. It’s a safety thing and a resale booster. If you’re adding one, plan early—cutting concrete comes with dust control, drainage, and usually a permit plus inspection.

Cold corners happen where exterior walls meet. Foam continuity and careful sealing at plate lines fix that. Another quirk: older basements sometimes have uneven concrete or “wavy” walls. Shimming studs and using a laser line makes drywall read straight even when concrete doesn’t.


Timeline, tools, and rough costs: what to expect

Every project is different, but here’s a rough rhythm for a standard basement wall package.

  • Timeline: 3 to 6 weeks for walls—faster if it’s just one big room, longer with bathrooms and built-ins.
  • Inspections: Framing, electrical, plumbing, insulation; sometimes separate fire blocking checks.
  • Tools you’ll actually use: Hammer drill with masonry bits, impact driver, miter saw, oscillating tool, 6-foot level and laser, powder-actuated fastener or Tapcons, drywall lift if you value your shoulders.

Cost ranges are wide, but for material-only wall finishing (no bath), folks often land in the mid-thousands depending on insulation type, soundproofing, and trim level. Spray foam costs more upfront but can help with comfort and air sealing. Rigid foam plus mineral wool is a smart middle path many Utah homeowners choose.


Common mistakes we see (and how to avoid them)

  • No foam against concrete: Batts alone can feel clammy. Use rigid foam or closed-cell spray foam against the concrete first when you can.
  • Skipping fire blocking: It’s a code requirement and a safety layer. Install it clean; inspectors appreciate tidy work.
  • Over-sealing with poly: A full poly vapor barrier inside can trap moisture. Consider a smart vapor retarder instead.
  • Under-wiring: Not enough outlets or circuits. Think ahead—treadmills, space heaters, gaming stations add up.
  • Rushing drywall: Fast mud work shows forever. Three light coats win every time.

DIY or call a pro? A quick gut check

Plenty of homeowners can handle parts of this—framing, insulation, even drywall if you’ve got patience. But when you add egress windows, spray foam, complex electrical, or a bathroom rough-in, bringing in a crew saves time and keeps everything to code. In Salt Lake County, Davis County, and Utah County, inspections are thorough. Passing the first time feels good, and it keeps your schedule on track.

We’ve seen folks do the framing and let us handle insulation, roughs, and drywall. That hybrid approach can balance budget with quality. If you’re unsure, walk the basement with a pro for a sanity check. We do that all the time—no pressure, just straight advice.


The step-by-step, simplified

For a quick recap you can screenshot:

  • Plan layout, outlets, and access to utilities. Pull permits.
  • Prep for moisture and radon. Fix water issues first.
  • Insulate with rigid foam or closed-cell spray foam against concrete.
  • Frame with treated plates, fire blocking, and straight lines.
  • Rough-in electrical, low-voltage, and plumbing where needed.
  • Vapor control with a smart membrane; add sound control where it matters.
  • Drywall, tape, and mud—clean and consistent.
  • Prime, paint, trim, and enjoy the finished space.

If you follow that sequence, your walls will look sharp, feel warm, and hold up for years.


A quick local reality check on codes

Our area follows state and local building codes, typically referencing modern IECC and IRC standards. Basements need proper egress for sleeping rooms, smoke/CO detectors, and insulation levels in line with local energy requirements. Always verify with your city (Salt Lake City, West Jordan, Bountiful, Layton, Lehi, Orem—you get the idea). And keep your inspection schedule on a simple checklist so nothing slips through the cracks.


Two or three small upgrades can elevate the whole project:

  • LED color temperature: 3000K feels cozy underground; 4000K can read a bit clinical.
  • Wall wash lighting: Aimed at art or built-ins, it adds depth to a room with limited windows.
  • Acoustic caulk: Around outlets and top plates near bedrooms, it quiets footfall and voices.
  • Conduit “future-proofing”: One 1-inch conduit run from the media wall back to a utility area is a lifesaver.

Little touches, big payoffs. It’s like adding the right spices—you notice the result even if you don’t know exactly what did it.


We build walls that stay straight, dry, and quiet. Our crews know the quirks of basements from Murray to Farmington to Spanish Fork, and we work clean—respecting your schedule and your home. We’re happy to consult on insulation choices, help with egress windows, or handle the whole package from permits to paint. If you’ve got a Pinterest board and a few measurements, we can turn that into a real plan fast.


Ready to finish your basement walls?

If you’re planning basement wall finishing in Salt Lake County, Davis County, or Utah County, we’d love to help you create a space that feels like it was always meant to be there. Call us at 801-515-3473 or tap Request a Free Quote to get started today. A quick conversation can save weeks of guesswork—and get your project moving the right way.

Source

Disclaimer: all images are owned and copyright by their respective owners and website (utbasementfinishing.com) and “https://madcitybasement.com/blog” is for news, information, product news and reviews.

Eliminating Persistent Smells at the Source

professional odour removal Calgary home

Introduction

Persistent indoor odours are more than a nuisance—they often indicate underlying issues such as mold growth, bacteria, or water damage. In Calgary homes, odours can linger long after the original cause appears resolved.

Professional odour removal in Calgary focuses on eliminating odours at their source rather than masking them temporarily.


Common Sources of Indoor Odours

Odours may originate from:

  • Mold and mildew

  • Smoke damage

  • Pet dander and urine

  • Cooking residue

  • Flooding or water damage

Without proper treatment, these odours often return.


Why DIY Odour Solutions Are Ineffective

Air fresheners and deodorizers only mask smells. They do not neutralize odour-causing compounds embedded in materials or circulating in the air.

Professional odour removal services in Calgary use advanced methods to break down odour molecules at a chemical level.


Professional Odour Removal Methods

Professional treatments may include:

Envirofog provides comprehensive odour removal Calgary services that improve both air quality and comfort.


When Odour Removal Is Necessary

Odour removal is especially important after:


Benefits of Professional Odour Removal

  • Long-lasting results

  • Improved indoor air quality

  • Reduced allergens and irritants

  • Restored usability of living spaces


Conclusion

Persistent odours are rarely superficial. Professional odour removal in Calgary addresses the underlying cause, restoring clean, breathable indoor environments.

Source

Disclaimer: all images are owned and copyright by their respective owners and website (blog.renovationfind.com) and “https://madcitybasement.com/blog” is for news, information, product news and reviews.

0
Back to Top

Search For Products

Product has been added to your cart