The Ultimate Basement Renovation Guide

Anyone with a basement in their home knows that that lower level can be a bit of a nuisance. Elevated levels of moisture are common. Having an additional powder room downstairs would be a godsend. Discussions about what to do with the space lead inevitably to thoughts of renovation. Well, this is the site. Here at the Ultimate Basement Renovation Guide, you will find hints, tips, tricks, ideas, and links to answers for questions that you have had about renovating your space. So, brew yourself a cup of tea, and settle in. We have a lot to share.

Why Renovate Your Basement?

Renovated basements can bring your family added space that could be an entertainment area, a guest suite, or a secondary, rental unit. Check your local municipality’s zoning and bylaws.

Issues in the foundation or problems with basement waterproofing may be found and addressed. Thoroughly sealing and insulating the basement increases your family’s comfort and provides more energy efficiency.

Finally, basement renovations increase your home’s value. Potential buyers will be attracted to increased square footage and the convenient possibilities that come with that space.

Planning Your Basement Renovation

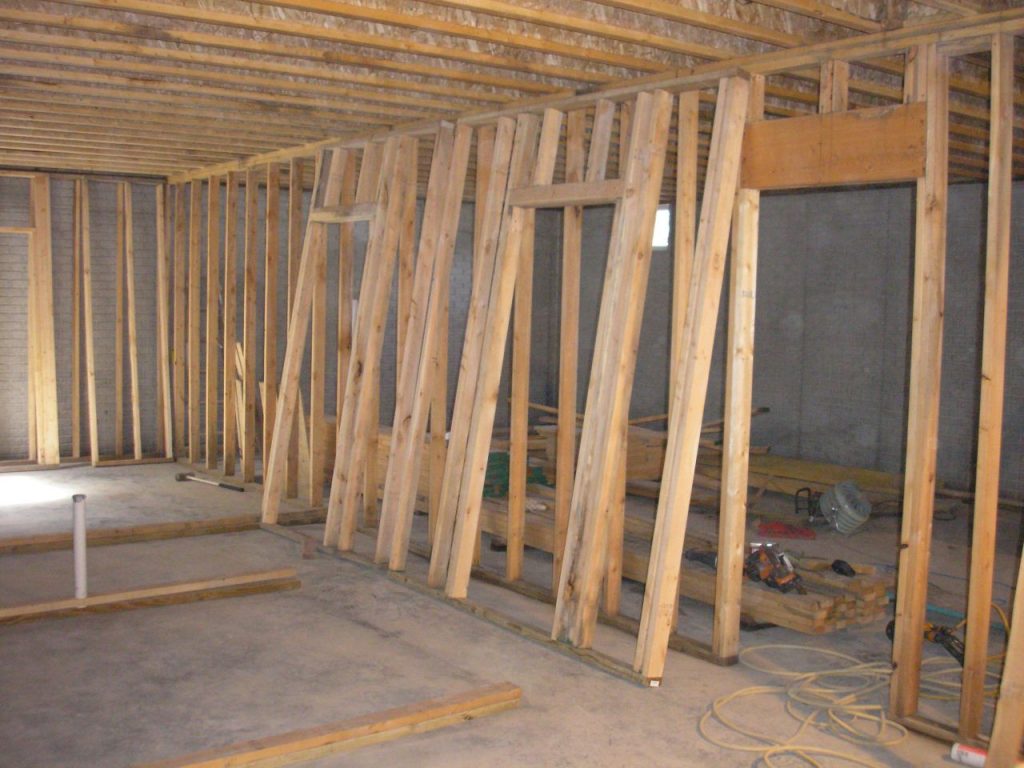
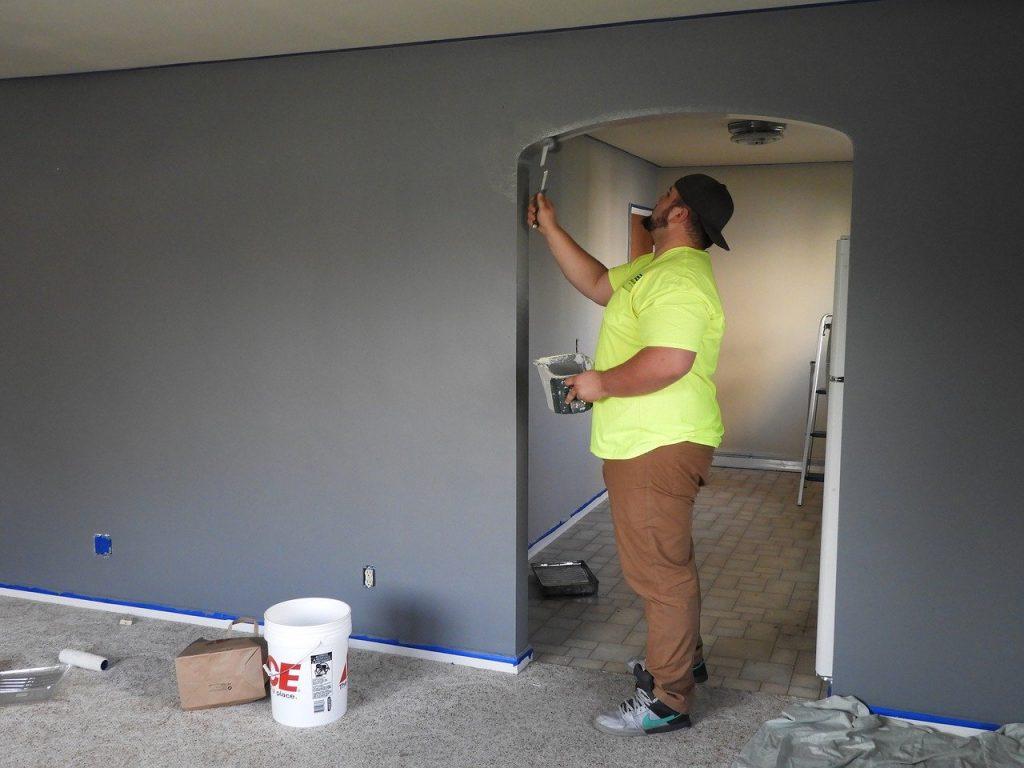
Before lifting your hammer, you need to realistically decide on a specific budget for the remodel and research building permits and codes. Create a floor plan that utilizes the space effectively noting items like support beams, ceiling height, and ventilation. Local codes may also require emergency exits if the remodel includes bedrooms. Basements usually have moisture issues, so correcting cracks in the foundation and waterproofing is key. If you have budgetary concerns, interior waterproofing is an excellent place to start.

Should You Hire a Basement Contractor or DIY?

In Ontario, you are allowed to complete electrical upgrades on your primary residence, but you will need to apply for and obtain a work permit and have the work inspected. Plumbing and structural upgrades or renovations are required to be completed by licensed tradesmen or professionals who will probably deal with permits. Budgeting for a professional waterproofing team is a good idea.

However, you may be able to realize substantial savings by removing fixtures and appliances, tearing down wall material and flooring, and doing a thorough cleaning yourself.

Key Questions to Ask Before Basement Finishing

Key questions to ask before doing work on your basement include:

  1. What is the purpose of this renovation? Why am I going through all the trouble?
  2. What permits do I need and where do I get them? (In Ontario, you are responsible for ensuring that the necessary permits have been collected.)
  3. What is our budget cut-off point?
  4. What will I do if I find cracks in the foundation?
  5. Is the height of the ceiling sufficient? How will I get more head space in the basement?

Common Basement Renovation Mistakes to Avoid

A common mistake made when renovating a basement is not considering moisture control enough. Inadequate ventilation can exacerbate moisture problems and improper waterproofing enhances that problem. That can lead to mould and wood rot. Not adding enough lighting or soundproofing in the basement are also common errors. Also, not planning properly, including not getting the necessary permits, is another rookie mistake. You should be aware of all potential mistakes and be able to discuss them with your contractor.

Image of Basement sound insulation

Basement Renovation Costs: What to Expect in 2026

Looking to the future in 2026, costs for a basement renovation are projected to stay relatively the same as in 2025. Of course, factors like the scope of the project, choices in materials and finishes, and labour will influence the amount of money that you will likely spend. However, with the trend of rising inflation, there may be a slight increase in the total costs. Along with everything else in your planning documents, budget for a 1-2% increase over the costs of 2025.

How Much Does It Cost to Renovate a Basement?

The final cost for a renovated basement will range due to size/layout of the basement, additions to electrical, plumbing, and structural components, and selected materials. Adding a bathroom or a kitchenette to your basement will increase costs.

Your basement walls and foundation may need work before the renovations can begin. That extra work increases costs of labour as waterproofing is not really considered a DIY project. Finally, don’t forget to have funds set aside from your budget for issues that might suddenly come up.

Average Cost Ranges in Ontario (Prices in CND)

Type of Remodel

7367_b595c7-ea>

Cost Per Sq/Ft

7367_368f40-46>

Total Cost – 800 Sq/Ft

7367_e3ec9d-c7>

Basic

7367_5b02fa-81>

$40 – $60

7367_3ac8c3-06>

$32,000 – $48,000

7367_304b53-c1>

Mid-Range

7367_b2dd0e-08>

$60 – $90

7367_8dd52c-73>

$48,000 – $72,000

7367_d02956-47>

Premium/Luxury

7367_ddb525-bd>

$90 – $150+

7367_85383c-48>

$72,000 – $120,000+

7367_f371ae-4a>

Legal Rental Suite

7367_23899e-af>

Costs can vary.

7367_7e99bd-29>

$60,000 – $120,000+

7367_3c221e-25>

Budgeting Tips for Basement Remodels

  1. Plan, plan, and followup. Plan a detailed budget that includes payments for labour, materials, permits, etc. Create a spreadsheet to you can follow up with records of where the money is going.
  2. Put 10-20% of budgeted amounts aside for any issues that suddenly rear up. Mold or moisture may not be seen until you take down the drywall.
  3. Get quotes from numerous contractors. Don’t just choose the lowest price, but check Yelp, the BBB, HomeStars, and other review sites for customer satisfaction.

Hidden Costs to Watch For

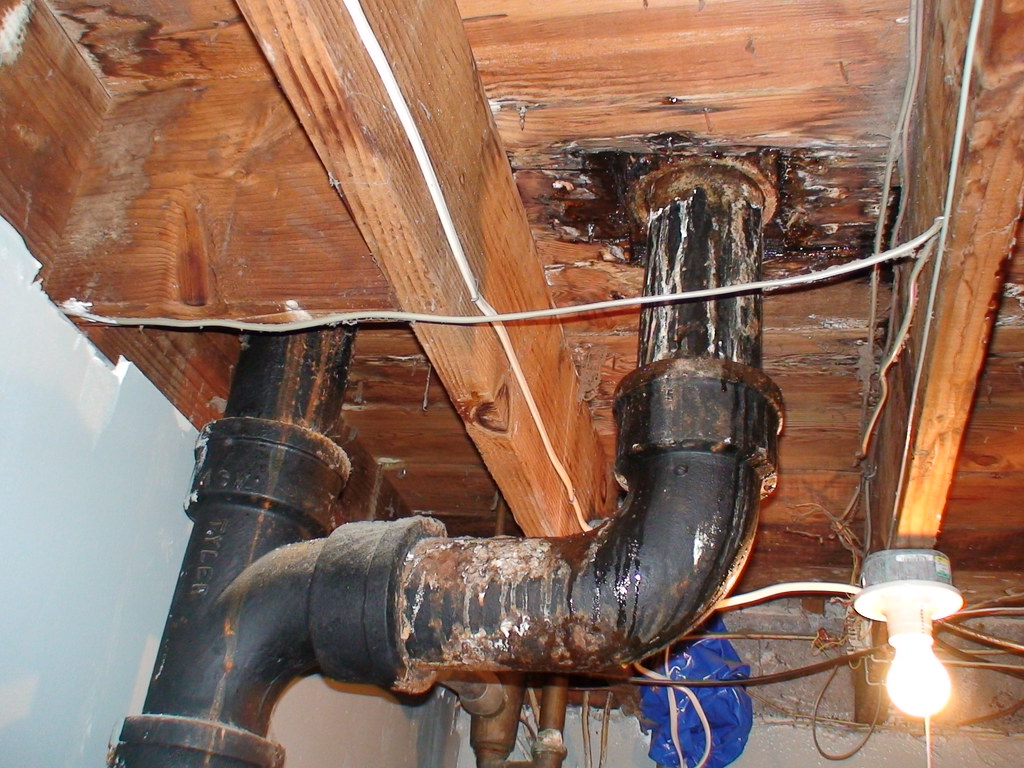
Hidden costs show up when demolition inside the basement begins. Behind the existing drywall, you may find that the electrical or plumbing is not up to code and must be upgraded. After moving storage units, you may find cracks and/or fissures in the walls or floor. There may be major structural issues that require more extensive alterations than what had been first thought. Also, the cost of appropriate, moisture-resistant materials may come as surprising. Working with a reputable contractor can mitigate surprise costs.

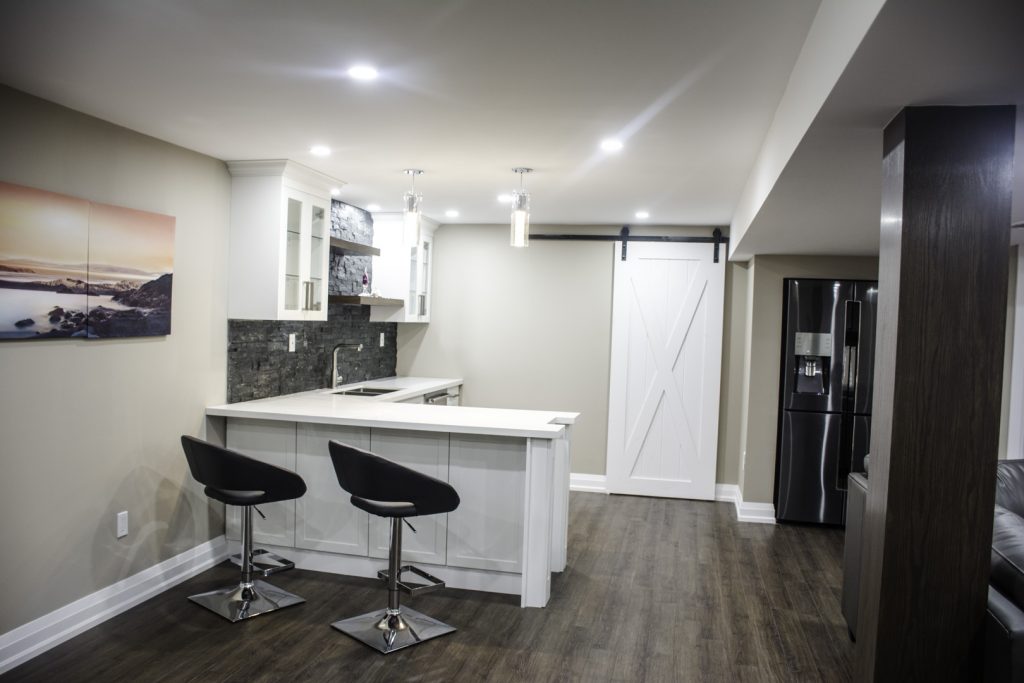
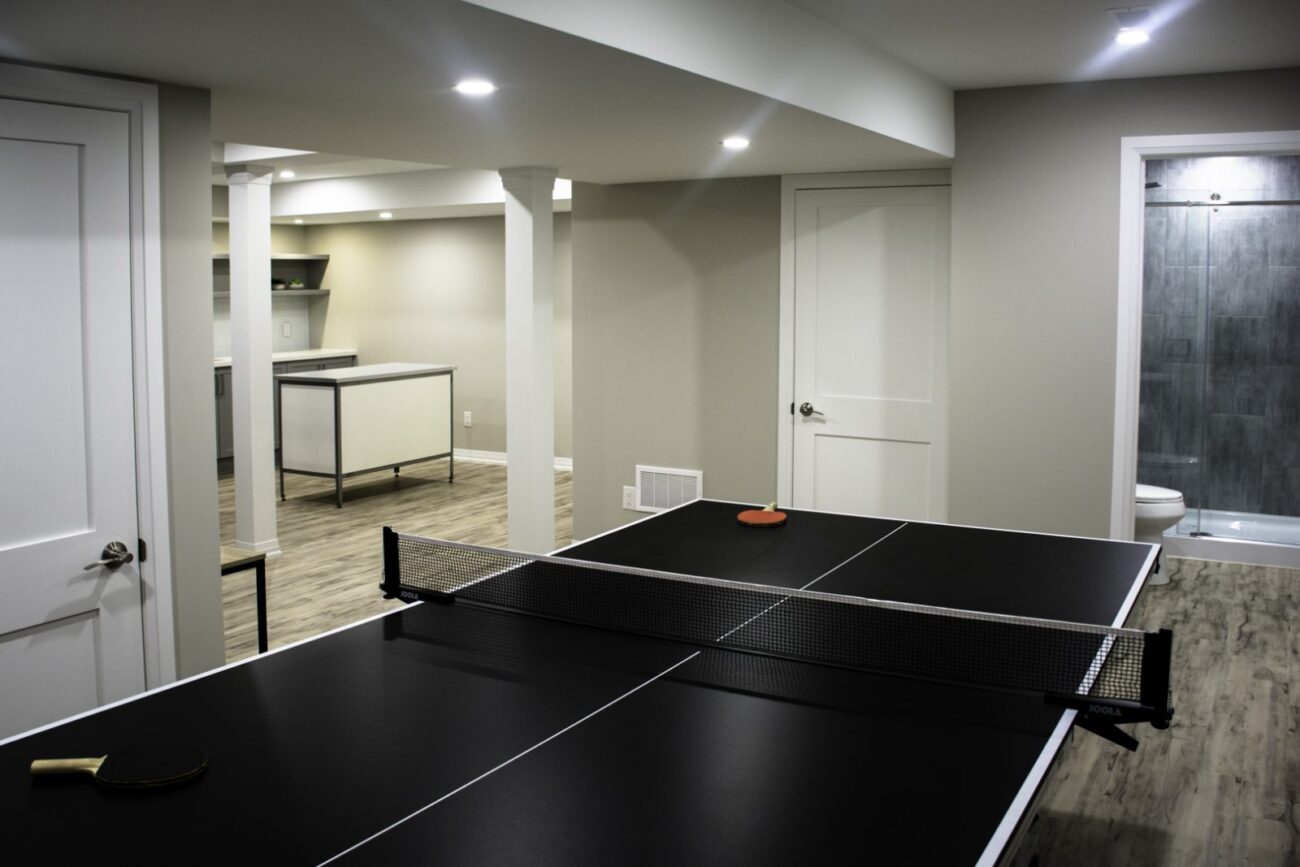
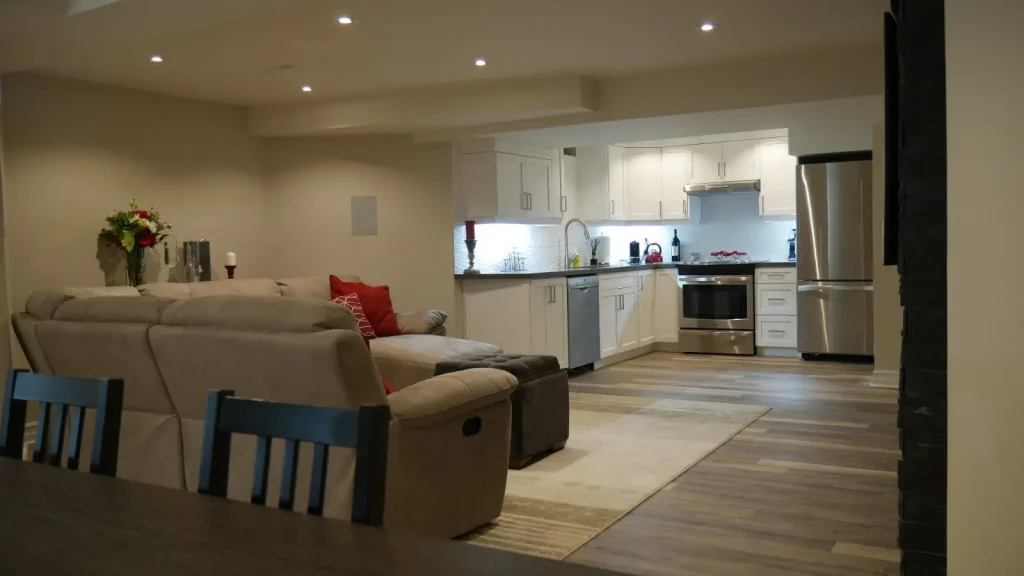
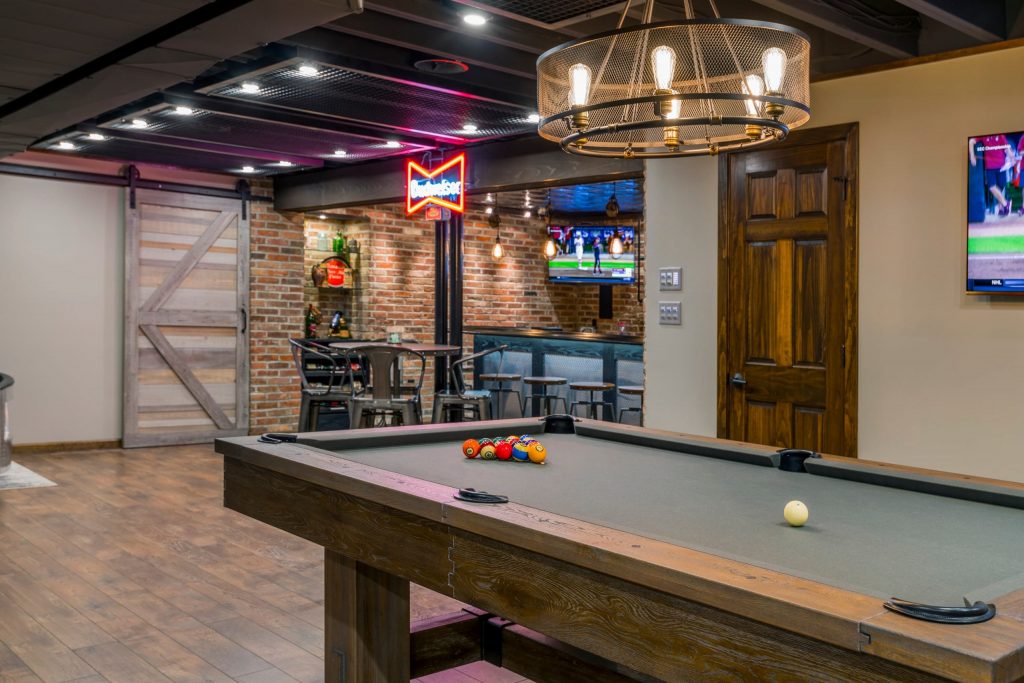
Basement Layout Ideas: From Storage to Secondary Suites

Basements are for more than a spider sanctuary. Some ideas that can elevate your basement to a higher level include:

  • For the kids: a basement playroom, an entertainment room, a game room
  • For the family: a home theatre, organized storage, a sauna, extra bedrooms, extra bathroom/kitchen, expanded laundry room,
  • For the adults: a home office, a wine cellar, a basement bar for gatherings, guest bedrooms, a den, a crafts room, and more.

A multitude of ideas meant to inspire can be found on Pinterest, YouTube, and other sites.

Basement Apartment, Gym, Theatre Room, Office & More

For a basement bedrooms, there are requirements in Ontario regarding minimums in amount of floor space and ceiling height. A window that can be used as an exit is mandatory. For a basement gym, adequate lighting and ventilation for moisture are very important as is making sure that the space is well insulated. Ceiling height needs to be considered. Offices should have a lot of light, natural light if possible, and they would benefit from extra soundproofing and ventilation.

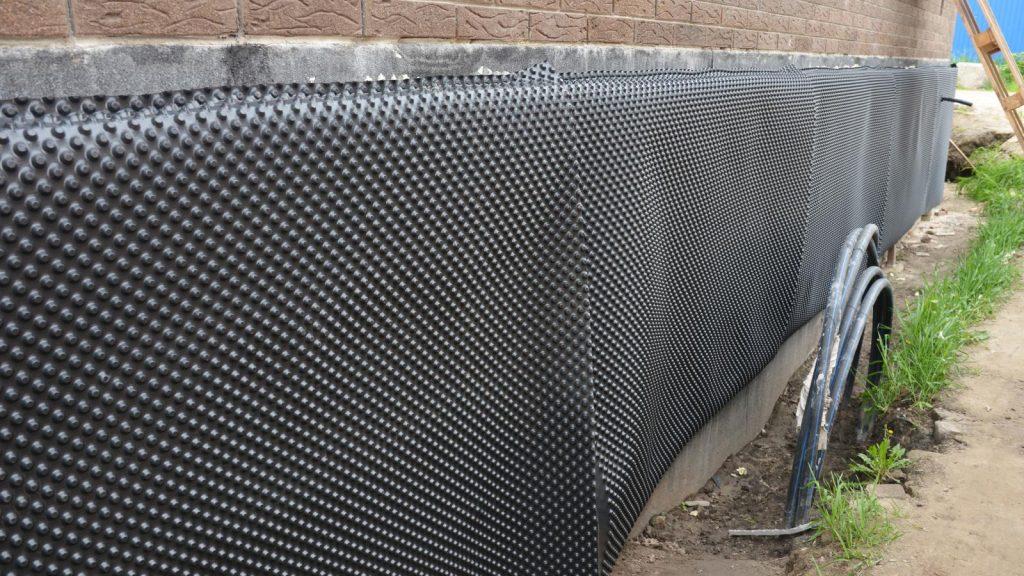
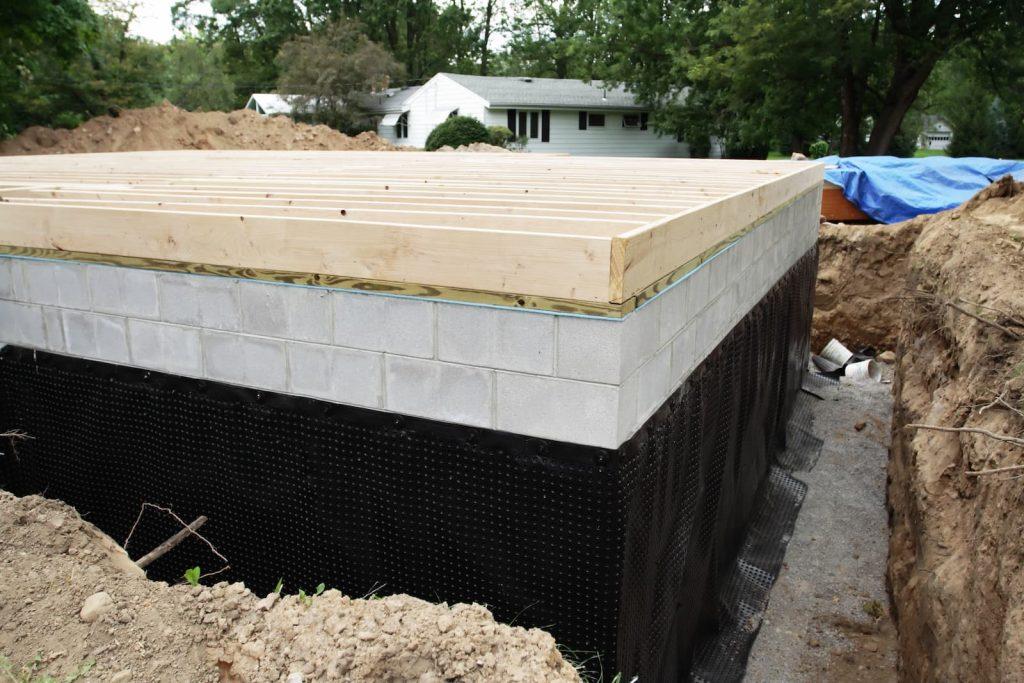
Basement Waterproofing & Moisture Control Essentials

If in fact there are no cracks or leaks in your foundation, consider yourself fortunate. To keep your home safe, it is recommended to install exterior and interior drainage to force water away from your home and its foundation. A sump pump in the basement floor is indispensable. Waterproof membranes, inside and out, stop water from entering your home. Increase ventilation to remove moist air, and a dehumidifier is very handy for removing what remains.

Interior vs Exterior Waterproofing: Which Is Better?

Exterior waterproofing is objectively better. It keeps water from entering your home by adhering a waterproof membrane to the foundation’s outer side. It is also more expensive with prices that can start at around $15,000.

Interior waterproofing can be effective for minor issues with a required sump pump to expel water from inside. It is less expensive with costs that start around $4,500.

Ideally, both of the types of waterproofing should be utilized to provide ultimate protection, but if budgeting is a concern, interior waterproofing is better than crossing your fingers.

Common Moisture Issues and How to Fix Them

Water in the basement is always a cause for concern, but water that condenses on basement surfaces may be solved with upgraded ventilation and the introduction of a dehumidifier. Drainage issues solutions for water entering is to add length to a gutter’s downspout and install French drains to re-direct water.

Foundation cracks are serious and should be sealed when found. Professional waterproofing installation on the interior can help. Also, finding moisture on the floor could indicate a water intrusion through the floor. That can be remedied with a sump pump plus a sealant or waterproofing on the basement floor.

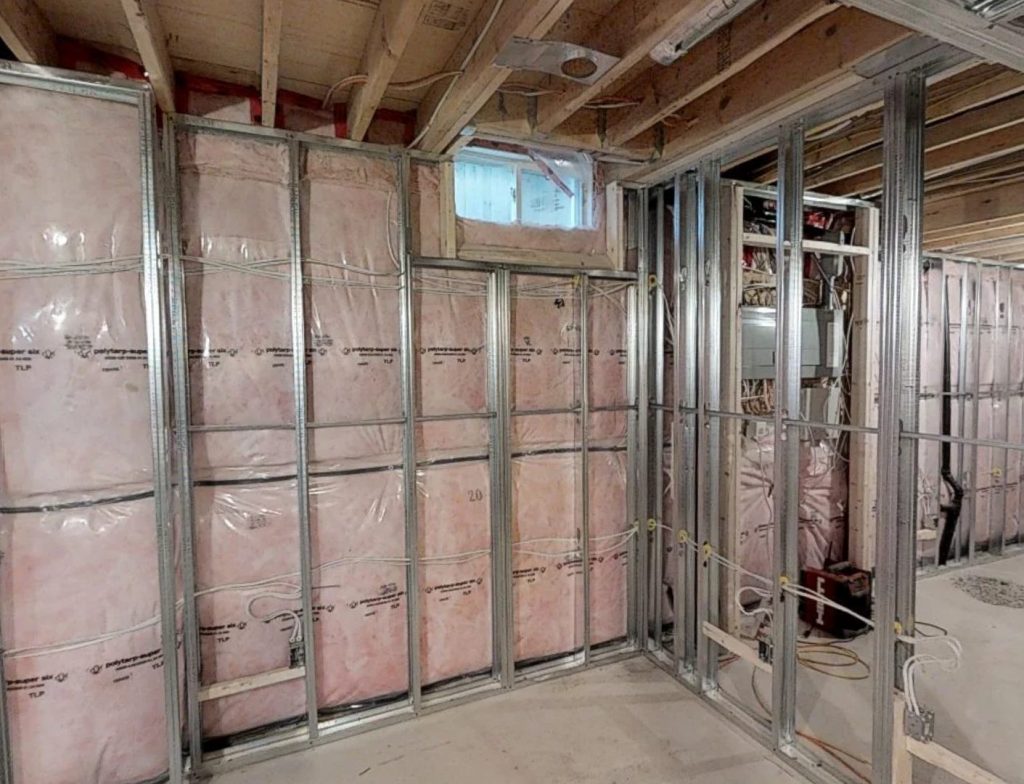
Basement Insulation & Building Envelope Tips

Twenty-five percent of a home’s total heat loss can come from uninsulated basements. For the best in interior insulation, rigid foam boards or closed-cell spray foam are considered best. Fibreglass batt insulation can absorb moisture and is not recommended. Before installing insulation, verify that all leaks and cracks in the foundation have been addressed. Ensure there are no gaps in the installation of the insulation. Check the R-value of the insulation: a higher number is higher energy efficiency. Also, consider having someone in to do a Home Energy Evaluation.

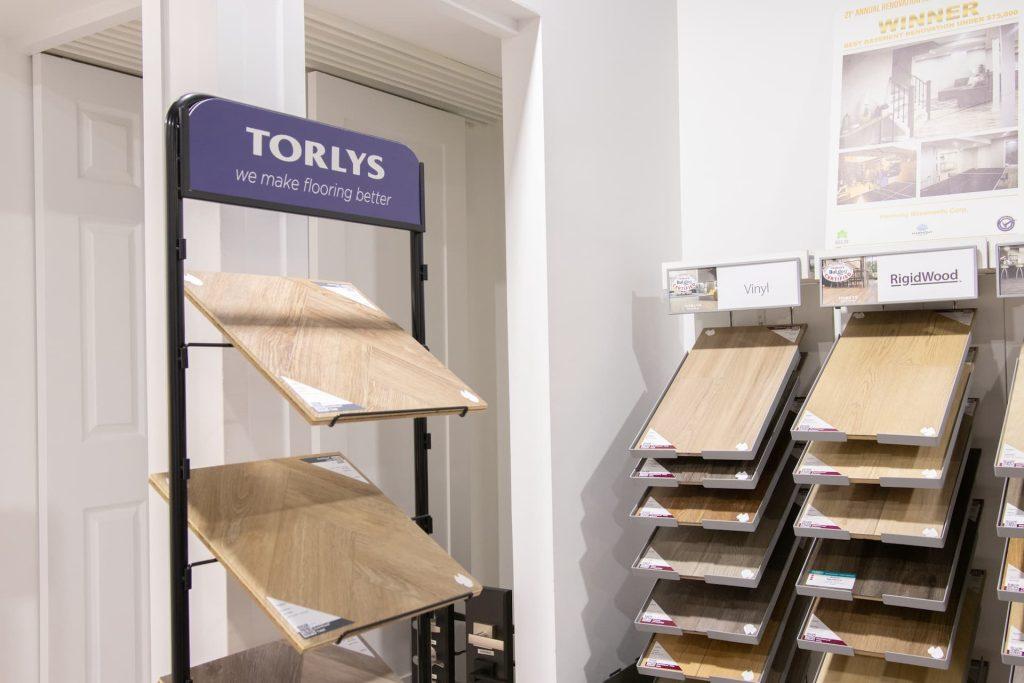
Flooring Options for Basements: What Works Best Below Grade?

There are several attractive and durable options for flooring available for your basement. Check out the following to see options for appearance, cost, pros and cons, and suitability for your home.

  • Polished Concrete – low maintenance, extremely durable, customizable appearance, hygienic, helps cut mould growth
  • Luxury Vinyl Plank (LVP) – waterproof, durable, realistic appearance with insulating properties
  • Epoxy – very long lasting, durable, widely customizable in appearance, hygienic
  • Engineered Hardwood – resistant to moisture, resistant to warping and expansion, installation flexibility
  • Porcelain/Ceramic Tile – waterproof, chemical and mould resistant, easy to clean, ideal for in-floor heating.

Engineered Wood vs Laminate

While both of these options look like real wood, the best choice would be engineered wood.

Engineered wood has a real wood layer covering layers of wood veneer making it extremely durable. The top wood layer reduces damage from moisture or humidity. It is higher in cost initially, but the long-term benefits make it a suitable choice between the two options.

Laminated wood is also made from layers of wood veneer, but the top layer is a decorative paper or plastic coating. While the top appears to be real wood, it cannot be be sanded as a repair. They are cheaper initially, but they can be damaged by water more easily, and damaged planks must be replaced.

Waterproof Flooring Myths

Waterproof floors do not keep your room waterproof since water can seep in underneath. Waterproofing does not automatically come from installing a waterproof floor. Also, flooring like engineered wood can still present with warping problems if liquid is allowed to stand on the surface. Finally, one of the biggest myths is if the flooring is waterproof, installation doesn’t matter. Unsealed seams, expansion gaps, and improper subfloor preparation would trump a waterproofing designation.

Best Flooring Materials for Moisture & Comfort

Moisture is a perennial factor in basement renovations and flooring materials need to reflect this. A moisture barrier is essential for any flooring material laid down. The most moisture resistant materials include Luxury Vinyl that comes in plank and tile forms while ceramic or porcelain tile is virtually waterproof. Slightly less impervious to moisture is engineered wood. Currently, subfloor systems are available. These panels are dimpled underneath which means unexpected moisture has a chance to circulate and dry rather than invade your home.

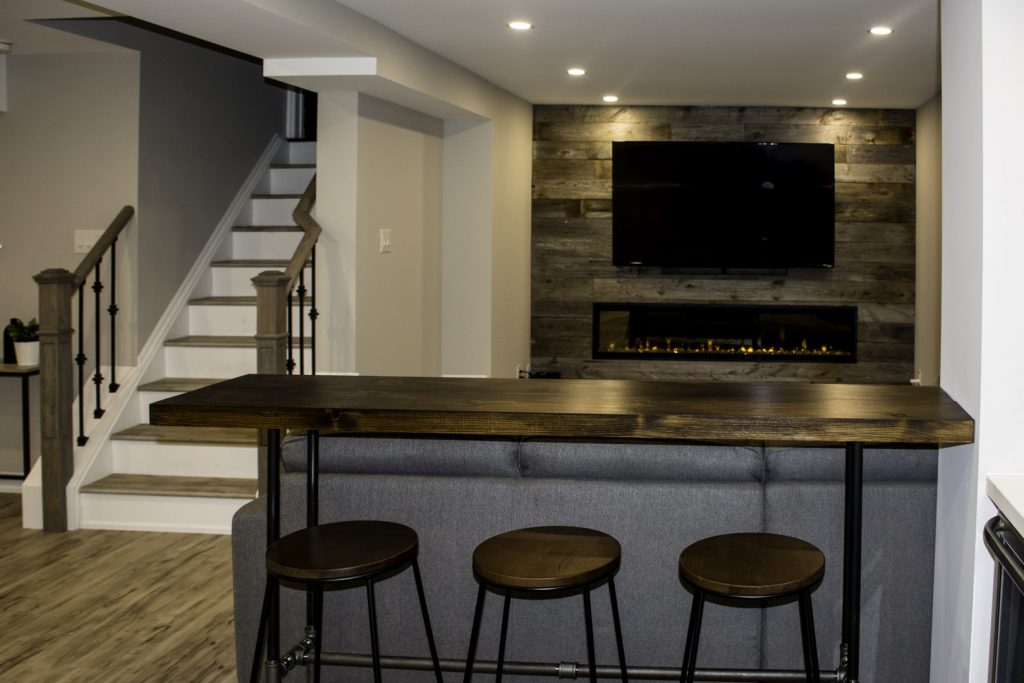
Ceiling, Wall, and Lighting Upgrades That Make a Big Impact Ceiling

Soundproofing placed in the floor above the basement during a remodel can cut down on noises from above or below. A suspended ceiling can be useful if access to plumbing, electrical, or HVAC systems is regularly needed. Maximize the ceiling height by exposing the structure and painting it all black for a hip, coffee house look.

Wall

Moisture and mold resistant drywall or PVC panels bring long-lasting, easy clean surfaces. Foam insulation on exterior walls sealing all gaps makes your home more energy efficient. Stone Plastic Composite (SPC) imitates stone like travertine and is easy to install.

Lighting

Recessed lighting or potlights sit inside the ceiling preventing them from being close for the less height challenged family members. Track lighting is economical compared to recessed lighting and saves having to cut into the ceiling. Smart lighting gives you control over brightness, colour, and temperature, and they have become more energy efficient.

Low Ceiling Solutions

Increase basement ceiling height by lifting the house, benching, and/or underpinning. Lifting the house is expensive and involves hoisting the house on jacks, adding to the foundation, and lowering the house. Second most expensive, underpinning involves digging under the foundation to add new supports extending the foundation down to more supportive soil below. The least expensive method is benching. This involves digging a new concrete shelf, or bench, around the boundary of a basement that would allow the floor in the centre to be dug out and lowered.

Basement Wall Finishing Dos & Don’ts

When basement wall finishing:

DO:

  • organize permits for structural changes
  • test for condensation and humidity
  • install polyurethane foam insulation
  • ensure for proper ventilation and ways to combat moisture
  • use basement designed materials like mold-resistant drywall
  • have an electrician use GFCI-protected outlets

DON’T:

  • forget to make sure all cracks, leaks, and problems with moisture are resolved
  • allow walls to come in direct contact with the foundation walls or floor. Leave a gap
  • install carpet right to a concrete floor. Do put moisture-resistant padding and a moisture barrier under the carpet
  • close in the walls without making sure that installation of all pipes, wires, etc has been completed

Creative Lighting Ideas for Dark Spaces

Basements are naturally dark, and layered light works well to banish shadows. A mixture of ambient, track, and accent lights fill the area well. Imitating natural light with simulated windows or skylights can add light and appear more natural. Using light coloured paints or reflective surfaces allows light to be reflected and may create the feeling of additional space. Smart lighting is handy because of the ability to control aspects of light such as colour, temperature, and brightness.

Bathroom, Kitchen, and Wet Areas in the Basement

Before beginning any work, making sure that your permits are in order is paramount. You will need to confirm that moisture problems have been eliminated and proper drainage is available. You may need to address gravity drainage with a sewage ejector pump. Install ventilation with timer switches that feeds exhaust directly out of the house. Choose materials that are moisture-resistant for floors and walls. Plan for lighting sources that can easily reach all corners of the basement.

Planning Plumbing & Ventilation Below Grade

Being below grade, or below ground level, brings up a number of issues. Normally waste is moved from a home through gravity, but in a basement below grade, a sewage ejector pump may be required. Backwater valves are vital to keep effluent from entering the home during bad weather. Ventilation becomes critical. Exhaust fans remove stale air and introduce fresh. With fewer windows or natural ways to ventilate, stale and potentially contaminated air can rise to the levels above in the home.

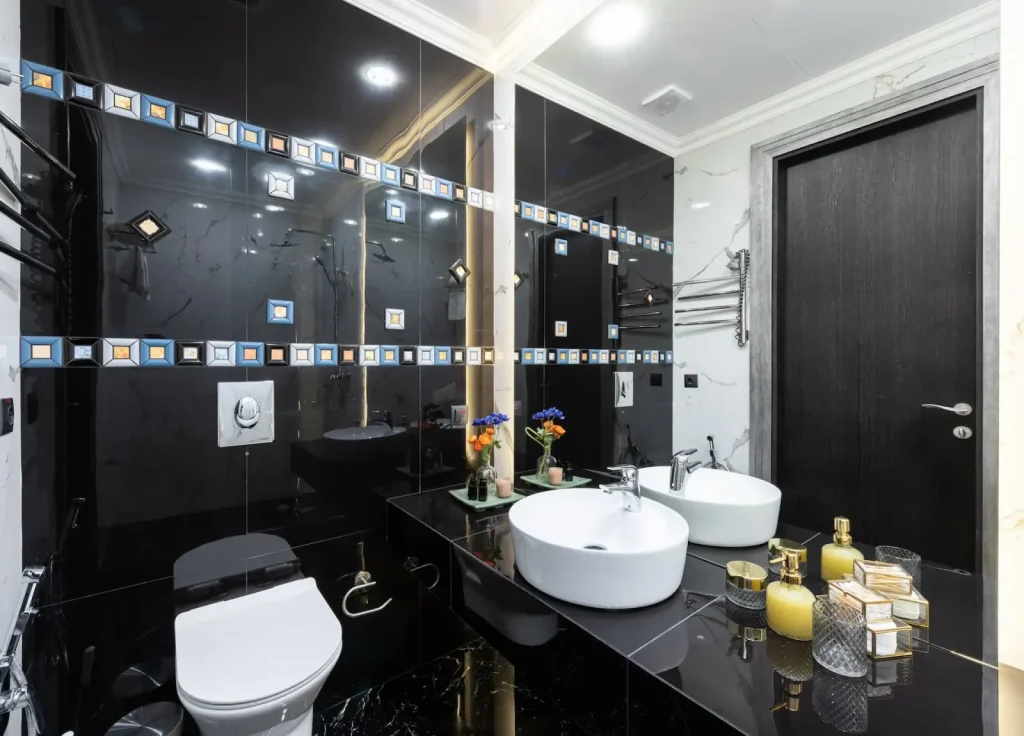
Basement Bathroom Designs and Ideas

Some of the basement bathroom design ideas coming for 2026 circle around having a personal wellness sanctuary in your own home. The focus is on a spa-like retreat with heated floors and steam showers. Floating vanities attached to the wall and designed with rounded edges visually make the space bigger and soften the overall look. Natural materials and textures like natural stone and bamboo are combined with textural finishes. The main idea is to create a personalized and comfortable basement getaway for wellness.

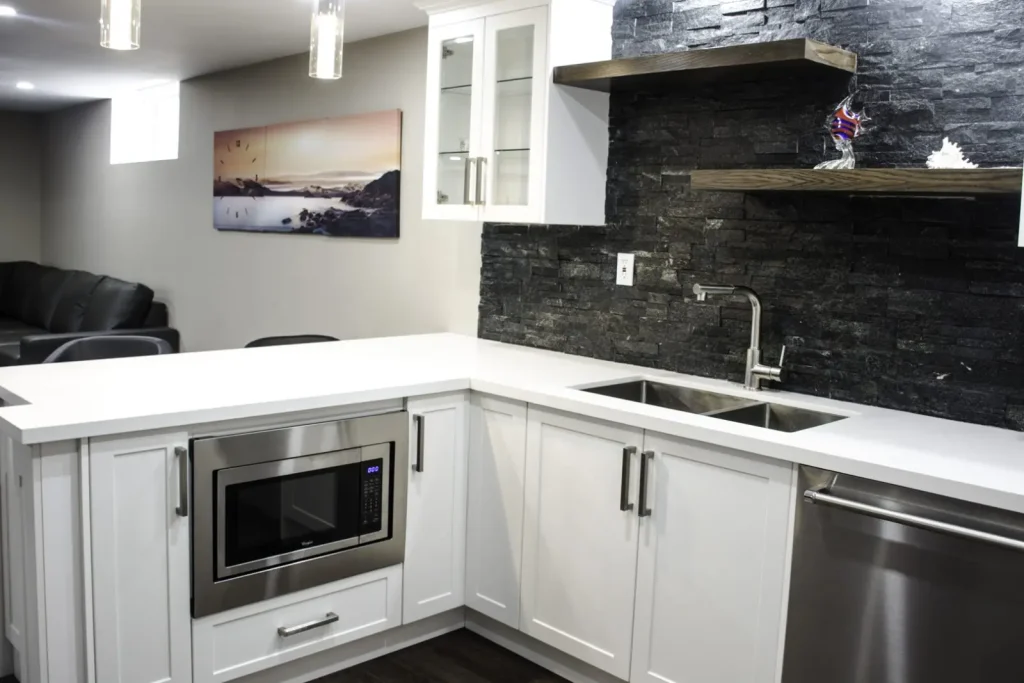
Designing a Functional Basement Kitchen

A basement kitchen needs to be well planned. Will the kitchen follow a galley style or open-concept layout? It will need separate areas for cooking, cleaning, and preparation for a uncomplicated flow through the kitchen. Layered lighting would be best to banish shadows and provide plenty of light. With cooking comes steam and moisture, not to mention odours, so increased ventilation is very important. Vertical storage and compact appliances will use less space but still have the functionality you need.

Climate, Comfort & Energy Efficiency

The key to comfort and energy efficiency in the basement is to create a heat barrier between the elements and your basement. Insulate your basement walls with spray foam or foam boards, and install insulated panels on the concrete floor. Higher rated R-value for the insulation would be best. Consider triple paned, double glazed windows for high-quality insulation. Utilize technology with radiant floor heating and smart thermostats. If feasible, extend your HVAC to the basement for added efficiency.

Heating Your Basement Efficiently

To heat your basement efficiently, you need to have good insulation, close off any air leaks, and eradicate moisture. To fight moisture, insulate with rigid foam board. You can also use a closed-cell spray foam, but it is can be expensive and should be professionally installed. Close drafts with caulking around windows, weather stripping, and door sweeps on doors. After verifying that you have no cracks or leaks in your foundation, a dehumidifier can help to take away excess moisture that cools the air.

Setting Ideal Humidity Levels

Controlling humidity in a basement happens on several levels. Ventilation for bathrooms and heavy appliances needs to release directly to the outside. Interior waterproofing, and ideally exterior as well, is a strong suggestion. Install a sump pump to discharge water out away from the home. Keep exterior water from gutters and downspouts directed away from the foundation. To keep a 30-50% humidity range, use a hygrometer and a dehumidifier to get rid of that final amount of excess moisture in the air.

Energy-Efficient Basement Renovation Tips

Focus on insulating the basement and sealing off any air leaks. Rigid foam board or closed-cell spray foam is best, and make sure that it has at least an R-value of 10. More R is better. Don’t forget to insulate the floor. LED lights with Smart controls use much less power and last a greater length of time. Look for the Energy Star sticker on your basement appliances and replace if possible. An Energy Star dehumidifier removes moisture while using less energy.

Design Trends and Color Inspiration for 2026

The trends for 2026 for basement renovations lean away from the single-use rumpus room format. Multifunctional layouts with versatile spaces for living, working, and playing. Wellness and restoration with home gyms and meditation corners are trending. Sustainable and natural materials are on the rise with incorporation of natural stone, bamboo, and linen. Also, sharp corners are on the fade with softer corners and arched doorways coming in vogue.

Basement Paint Colors That Brighten & Modernize

Crisp and sterile whites help brighten a basement, but neutral colours with softer blues and yellows are coming into fashion for 2026. Various paint companies “Colour of the Year” feature brightening neutrals such as a creamy ivory with peach undertones, an earthy khaki, and a warm, glowing soft yellow. Connected to the sustainable and natural material suggestion for walls and ceilings, nature-inspired earthy grey-greens, restorative olive green, or an airy light blue are also trending.

Creative Decor Ideas for Poles, Playrooms & Bars

For poles or posts used as support, they can become Roman columns, tree trunks, or mini-bookshelves as disguises. They can be incorporated into a round, pub-style table, or they can be wrapped in thick, hemp rope for a rustic feel. Themed playrooms in their own space with activity walls, a reading nook, and adequate child-toy-sized storage are winners with the kids. For the adult kids, the kitschy tiki tropical bar theme is back. Otherwise, a sleek high-gloss modern look or a 1930s speakeasy vibe are also in vogue at this time.

Legal Requirements, Permits, and Basement Apartment Rules

Legally, to creating a basement apartment, you will need to get all the permits before starting. Check to see if you are in an area zoned for a secondary suite. Inspections must be regularly carried out, and the Electrical Safety Authority (ESA) must issue a compulsory certificate. There needs to be egress windows for each bedroom and be fully contained: separate entrance, kitchen, bathroom, and interconnected smoke and CO alarms. Check here for more detailed information for Ontario.

Ontario Basement Apartment Regulations

If you are thinking about building a basement apartment, you must get building and zoning permits from your municipality. The apartment must conform with the Building and Fire codes of Ontario. That includes having a ceiling height of 2.1 metres, smoke and CO detectors, and an ESA certificate for the work your electrician does. There also needs to be a separate entrance as well as an egress window since a basement apartment is a habitable space.

What Is a Renoviction?

A renoviction is an eviction of a tenant for the purpose of performing a renovation on the apartment. Tenants must receive an N13 written notice at least 3 months before work is to begin although a tenant can dispute the notice if they believe the landlord acted in bad faith. The tenant has a right to move back to the unit at the same rent after the reno. The landlord needs to show the remodel is extensive, and he must provide a professional report justifying the renovation. Check here for Ontario and here for Toronto for bylaws regarding renovictions.

Basement Safety & Egress Codes

In Ontario, there are specific codes and regulations concerning basement safety and egress. Some include:

  • Windows must be at least 38cm (15in) for both height and width and no more than 1m (39in) from the floor
  • Window wells for below ground windows must project at least 76cm (30in) from the wall and needs a ladder if they are more than 150cm (59in)
  • Windows must stay open by themselves and be opened with ease from inside
  • Basements must have 2 or more exits separated far apart from each other
  • Hiring a contractor is suggested

Final Thoughts

Hopefully, you will have found all of the answers that you need to decide what to do with your basement. Will it become a rental suite that could augment your family income? Will it be segmented into a family / entertainment / wellness space? Will you take time to make needed repairs before considering a remodel? If you have further questions, we can help. At Harmony Basements, we have had these conversations numerous times with numerous home owners.

Feel free to contact us today to ask how we can make your basement an integral part of your home.


Source

Disclaimer: all images are owned and copyright by their respective owners and website (harmonybasements.ca) and “https://madcitybasement.com/blog” is for news, information, product news and reviews.

Basement Billiard and Game Rooms: Entertainment Galore

If you’re a fan of friendly competition, social gatherings, or simply relaxing with friends and family, a basement billiard and game room can be the ultimate addition to your home. Imagine having a space where you can shoot pool, play board games, or challenge each other to a round of foosball or darts—all in the comfort of your finished basement. At Utah Basement Finishing, we’re passionate about creating spaces that bring people together for fun and entertainment. In this blog post, we’ll explore how to design and finish a basement game room that’s perfect for endless hours of enjoyment.

The Appeal of a Game Room

1. Social Hub

A game room in your basement becomes a social hub where friends and family can come together for quality time and friendly competition.

2. Stress Relief

Playing games is a fantastic way to unwind, relieve stress, and take a break from the demands of everyday life.

3. Variety of Activities

A well-equipped game room can offer a variety of activities, ensuring there’s something for everyone to enjoy, regardless of age or interests.

4. Enhanced Home Value

A finished basement with a game room adds value to your home, making it more attractive to potential buyers.

Designing Your Basement Game Room

1. Game Selection

Choose the games you want to include in your basement game room. Common options include billiards, table tennis, air hockey, foosball, board games, and card tables.

2. Layout and Space Planning

Determine the layout of your game room to ensure there’s enough space for each activity. Consider adding seating and tables for spectators.

3. Lighting

Install appropriate lighting for each gaming area to ensure visibility and create the right ambiance. Pendant lights or track lighting can work well.

4. Flooring

Select durable and easy-to-clean flooring, such as laminate, luxury vinyl, or carpet tiles, to withstand the wear and tear of game room activities.

5. Game Storage

Incorporate storage solutions for game pieces, cues, balls, cards, and other accessories to keep the room organized.

Personalize Your Game Room

1. Decor and Theme

Choose a decor theme that matches your personal style or the vibe you want to create. It could be a sports-themed room, a retro arcade, or a classic billiard parlor.

2. Wall Art

Decorate the walls with sports memorabilia, vintage game posters, or artwork that complements the theme of your game room.

3. Seating

Provide comfortable seating options for players and spectators. Bean bags, barstools, and comfy couches are great choices.

4. Snack Bar

Consider adding a small snack bar or mini-fridge to keep refreshments easily accessible during game sessions.

Consult with Utah Basement Finishing

At Utah Basement Finishing, we have experience in designing and finishing basement game rooms that cater to your entertainment needs. Our team can collaborate with you to create a space that’s not only fun but also functional and stylish.

Let the Games Begin

A basement billiard and game room is more than just a place for leisure; it’s where lasting memories are made, laughter fills the air, and friendly rivalries are born. It’s the heart of entertainment in your home.

Ready to bring entertainment galore to your basement? Contact us today at 801-669-8106 or visit our website here to discuss your vision and start the journey to a basement game room that promises endless fun and excitement.

Source

Disclaimer: all images are owned and copyright by their respective owners and website (utbasementfinishing.com) and “https://madcitybasement.com/blog” is for news, information, product news and reviews.

Hot Tub Wiring Edmonton | Hauer Power Electrical Inc.

Installing a hot tub is an exciting upgrade, but it requires careful electrical planning. Hot tub wiring involves high electrical loads and strict safety requirements, making professional installation essential.

Why Hot Tub Wiring Requires Professional Installation

Hot tubs typically require dedicated circuits and proper grounding. Many existing electrical panels do not have the capacity to safely support this load without upgrades.

An electrical panel upgrade in Edmonton is often necessary before hot tub wiring can be completed.

Electrical Service Upgrades and Safety

Electrical service upgrades ensure your system can safely handle the additional load. This reduces the risk of breaker trips, overheating, and electrical failures.

Hauer Power Electrical Inc. evaluates each installation to determine whether service upgrades are required.

Code Compliance and Inspections

Hot tub wiring must meet strict electrical codes and pass inspections. Licensed electricians ensure all wiring, breakers, and disconnects are installed correctly and safely.

Protecting Your Investment

Proper hot tub wiring protects both your equipment and your home. Professional installation reduces long-term maintenance issues and ensures reliable operation.

Contact Us

For safe and professional hot tub wiring in Edmonton, visit https://hauerpower.ca/ and work with Hauer Power Electrical Inc.

Source

Disclaimer: all images are owned and copyright by their respective owners and website (blog.renovationfind.com) and “https://madcitybasement.com/blog” is for news, information, product news and reviews.

Can You Finish a Basement During Winter?

Many people think renovation work can only be done during warm months. While the summer is peak season for home improvement projects, winter construction planning is entirely possible. In fact, in many cases, winter is actually an ideal time to renovate your basement. With proper planning, humidity control, and the right contractors, your basement remodel can move forward smoothly despite the cold weather outside.

In this blog, we will break down the advantages, challenges, and offer tips to help you confidently determine whether winter is the best season for your basement renovation.

Key Takeaways
  • Since most basement renovation work happens indoors and is not affected by outdoor temperatures, you can finish your basement during winter.
  • Winter construction often offers better contractor availability, resulting in faster scheduling, and sometimes, lower off-season pricing.
  • Cold weather does present some challenges, including slower drying times, moisture control issues, and the need for strategic heating and ventilation.
  • Most basement renovation tasks i.e. framing, electrical, plumbing, insulation, drywall, flooring, and finishing can be completed efficiently in cold weather.
  • With the right contractors, winter basement renovations can be smooth, efficient, and cost-effective.

Is It Possible to Renovate a Basement in the Winter Months?

Yes. Finishing a basement in winter is not only possible but often more convenient than during peak season. Since basements are insulated spaces below ground level, they are naturally protected from harsh outdoor conditions. Most basement reno work like framing, electrical, plumbing, insulation, drywall, and flooring takes place indoors, making winter basement remodels completely feasible.

However, it is important to note that cold weather can affect humidity, drying times, and comfort. That’s why it is important to work with experienced professionals who understand the challenges that come with winter construction. A knowledgeable team will know how to manage heat, ventilation, and moisture levels to ensure that all materials cure and perform properly.

Advantages of Finishing a Basement During Winter

Challenges of Winter Basement Renovations

While winter is a suitable time to renovate, it does come with unique considerations that we must note. Some basement construction winter challenges include:

What Work Can Safely Be Done in Winter?

A wide range of renovation tasks can be completed without issue during winter. Many of these tasks benefit from controlled indoor conditions.

Image of Basement sound insulation

Tips to Successfully Finish a Basement in Cold Weather

There are some things that go a long way in making construction during winter easier. These strategies can help your basement renovation in winter proceed smoothly and efficiently. To keep your project efficient, comfortable, and on schedule, consider the following:

  • Maintain consistent heat – A stable temperature speeds up drying and ensures materials perform as they should.
  • Control humidity – Use dehumidifiers or HRV systems to prevent moisture buildup.
  • Plan ventilation – Having proper airflow prevents fumes and improves indoor air quality during construction.
  • Choose materials wisely – Some coatings, adhesives, and paints are formulated for cold-weather performance. Use these.
  • Work with experienced contractors – Choose bathroom renovators with winter construction planning experience and who understand the complexities of basement work during colder months.
  • Insulate early – Prioritizing insulation helps regulate temperature as construction gets underway.

Should You Wait Until Spring? Factors to Consider

For many homeowners, winter renovations benefits like better flexibility, timing, and contractor availability far outweigh the challenges. Although winter renovations are feasible, you may benefit from waiting until spring if:

  • Your basement requires significant exterior work (e.g., foundation repair, window replacement
  • You cannot maintain adequate heating during the project
  • You prefer open windows for ventilation during painting or staining
  • You plan to coordinate with other major projects scheduled for the spring or summer

Final Thoughts

So, is it okay to renovate a basement in cold weather? Absolutely! With proper moisture control, heating, and planning, renovating in winter is not only suitable, it can be one of the best times to upgrade your basement. Better contractor availability, faster scheduling, and the ability to use your new space by spring make winter an appealing season for home upgrades. If you’re considering a basement project, don’t let the cold stop you. With the right basement professionals working on your project, you can transform your basement into a comfortable, inviting, and functional part of your home. 

Contact us today for more information on our basement renovation services!

by Iurii


Source

Disclaimer: all images are owned and copyright by their respective owners and website (harmonybasements.ca) and “https://madcitybasement.com/blog” is for news, information, product news and reviews.

Innovative Basement Finishing Plans for Every Budget

Your basement is probably doing more than you think—quietly waiting under your feet with a big “what if” attached. Extra bedroom? A place for movie nights? A rental that helps with the mortgage? You know what—there’s room for all of it. At Utah Basement Finishing, we build innovative basement Finishing plans that fit the way you live and the budget you’re working with. This guide walks through smart ideas for Salt Lake County, Davis County, and Utah County homeowners who want more space, more comfort, and fewer headaches.


Utah basements aren’t like everyone else’s—and that matters

Along the Wasatch Front, basements run cooler and drier in winter, then swing during spring snowmelt. Add in our winter inversions and summer heat, and you get one clear takeaway: Utah basement Remodeling succeeds when it handles moisture, air, and comfort first. That’s not glamorous, but it’s how you get a space that looks good and feels good.

We design for real life here—Daybreak to Bountiful, Lehi to Cottonwood Heights—so the details shift a little by neighborhood. Older homes in Salt Lake often need electrical and egress updates. Newer homes in Davis and Utah County are usually perfect for media rooms, second Kitchens, or a guest suite. Same goal, different path.


Start smart: planning, code, and the stuff you can’t see

Here’s the thing: the unsexy steps save money later. A quick checklist keeps you out of trouble and moving fast.

  • Moisture and radon: Test for moisture intrusion at slab and walls; add a capillary break or subfloor where needed. Utah has known radon pockets—consider radon mitigation (fan and vent stack) before drywall.
  • Egress compliance: If you’re adding a bedroom, code calls for a window with at least 5.7 sq. ft. of net clear opening (min 20 in. width, 24 in. height), a sill no higher than 44 in., and a ladder if the well is over 44 in. deep.
  • Insulation and air sealing: Rigid foam (like Owens Corning Foamular) against the concrete, then framed walls with mineral wool or fiberglass. Keeps walls warmer and resists mold.
  • Electrical and permits: Most projects need permits in Salt Lake County, Davis County, and Utah County. It’s routine; we handle drawings, permit pulls, and inspections.

Let me explain why this matters: once drywall is up, fixes Cost more. Do the bones right, then the finish work becomes the fun part.


Plans for every budget: fast reference

Budgets vary with square footage, finishes, and layout. But a ballpark helps you think clearly. Timelines assume an open layout and standard ceiling height.

Budget Range Highlights Typical Timeline
Under $10k Moisture control, paint, lighting upgrade, partial floor refresh 1–3 weeks
$10k–$25k One finished zone: media nook, office, play area; basic bath rough-ins 3–6 weeks
$25k–$50k Family suite: bedroom with egress, cozy living area, full bath 6–10 weeks
$50k–$90k+ Premium finish: wet bar or kitchenette, theater, gym, custom storage 8–14+ weeks

Not sure where you land? We map a phased plan so you can finish in steps without rework.


Under $10k: smart refresh that feels bigger than the price tag

If you’ve got decent framing and no active leaks, this budget goes surprisingly far.

  • Moisture defense first: Seal slab cracks, add a breathable sealer, and fix gutters or grading outside. Small fix, big payoff.
  • Lighting that changes everything: Add LED can lights with warmer temps for a cozy feel, plus a few Lutron dimmers. Basements love layered light.
  • Simple floor wins: Replace worn carpet with LVP in a traffic zone; leave Bedrooms carpeted for warmth. Easy clean, easy life.
  • Paint for depth: Soft whites with warm undertones reflect light and keep things bright. It’s basic, but it works.

Honestly, owners tell us this light-and-floor combo feels like a whole new space. It’s not magic; it’s good sequencing.


$10k–$25k: a finished zone you’ll use every day

Here we create one polished area that proves the concept. It might be a home office, a reading den, or a starter media room.

  • Defined layout: Frame a small wall for separation; add a solid-core door for quiet if you work from home.
  • Prepping for the future: Run plumbing rough-ins for a later bath while walls are open. Cheap now, pricey later.
  • Sound comfort: Use ROCKWOOL Safe’n’Sound in the ceiling and a layer of 5/8 drywall. It dampens footfall noise from upstairs.
  • Storage that fits: Built-in shelves or under-stair drawers. Little spaces add up.

With this tier, you’re not finishing everything—on purpose. You’re finishing the right things, the right way.


$25k–$50k: family-ready with a bedroom, bath, and a real hangout

This is the sweet spot for many homes across Salt Lake County, Davis County, and Utah County. You get a legal bedroom, a comfortable living area, and a bathroom that doesn’t feel like an afterthought.

  • Egress window done right: Proper well drainage, ladder, and trim. Daylight matters downstairs.
  • Full bath with quality fixtures: Think Delta or Moen valves, a quiet Panasonic fan, and bright task lighting.
  • Media-friendly layout: Low-voltage runs for a clean TV wall; conduit for future upgrades so you’re not fishing later.
  • Warm floors: DRIcore or a similar subfloor system under LVP or carpet helps cut that concrete chill.

It’s the kind of space that makes winter feel shorter and family time easier.


If you’ve got bigger plans—multi-use space, theater, gym, or a rental-ready suite—this tier covers craftsmanship and comfort.

  • Wet bar or kitchenette: Under-cabinet lighting, a quiet dishwasher, and a beverage fridge. Add Schluter Ditra under tile for crack control.
  • Theater details: Dedicated circuits, acoustical treatments, and a projector throw set to your room depth. QuietRock 510 can help with sound bleed.
  • Home gym zone: Rubber flooring, extra ventilation, and wall blocking for racks and mirrors.
  • Better HVAC control: Zoning or a smart sensor system so the basement isn’t always colder than upstairs.

It’s not about “fancy.” It’s about a basement that lives like the main floor. Or better.


Phased finishing: build in stages without doing things twice

Maybe you’re budget-conscious right now. Or life is busy. We plan the project so you can finish in steps and still hit the end vision.

  • Phase 1: Moisture/radon checks, insulation, framing, and rough-ins for plumbing and electrical.
  • Phase 2: Drywall, basic floors, and a finished living area.
  • Phase 3: Bath, built-ins, wet bar, and final lighting upgrades.

You get a usable space each step, not a construction zone for months. That’s the point.


Layouts that work in real Utah homes

Basements aren’t one-size-fits-all. Here are a few plans that keep showing up because they actually get used.

  • Flex media + play zone: Open living room with a tucked-in play area behind a half wall. Easy to supervise, easy to clean.
  • Guest suite with privacy: Bedroom at the back, bath between, living area up front. Quiet for family or visitors.
  • Office + gym combo: Shared room with a sliding partition. Mornings for workouts, afternoons for Zoom calls.
  • Rental-ready suite: If zoning allows, a separate entrance, kitchenette, and proper fire separation. We’ll confirm local rules first.

You can’t force a layout that fights the foundation. We flow with the structure, which keeps costs predictable.


Materials that matter: floors, walls, and light

We keep an eye on durability, comfort, and cost. A few picks we use often:

Material Why We Like It Where It Shines
LVP flooring Water-resistant, warm underfoot with subfloor, easy to clean Living areas, playrooms, hallways
Carpet with pad Soft, quiet, budget-friendly warmth Bedrooms, Theater Rooms
Rigid foam + mineral wool Warmer walls, better sound control, mold resistant Perimeter walls and ceilings

On walls, we like 5/8 drywall on ceilings for sound. On lighting, bright LEDs paired with warm accent lamps. Simple tools, strong results.


Comfort that sticks: HVAC, insulation, and sound

Basements don’t need to feel like basements. The science helps.

  • Right-sized airflow: Add supplies and returns where the room actually is now, not where the builder guessed.
  • Smart control: A temperature sensor downstairs lets your thermostat read the room that’s in use.
  • Sound balance: Safe’n’Sound in joists, solid-core doors, and a few strategic seals around can lights make a real difference.
  • Dry and healthy: A quiet dehumidifier protects finishes during shoulder seasons, especially near the lake.

None of this is flashy. But comfort is what makes a basement inviting in February when the snow piles up.


Permits, timelines, and local quirks along the Wasatch Front

We handle permits in Salt Lake County, Davis County, and Utah County. Expect 1–3 weeks for approvals depending on city load. During winter, concrete and egress wells need a little scheduling finesse; we plan around freezes and thaw cycles.

Inspections run smoothly when the plan is clean and the work is documented. We keep a tidy site and communicate clearly with inspectors. It’s boring, but it speeds you up.


How to pick the right partner (even if it’s not us)

A few simple checks will protect your budget and your timeline.

  • See real projects: Ask for local references and photos—think Herriman, Farmington, American Fork. Similar homes, similar results.
  • Scope in writing: Look for a clear scope with allowances for finishes. Fuzzy bids lead to change orders.
  • Moisture plan: If a contractor shrugs at radon or water, keep walking.
  • Schedule you can track: Weekly updates, one point of contact, and honest timelines.

We build with that same playbook. It’s the only way to keep trust intact.


Quick snapshots: what people invest and what they get

Every home is different, but these snapshots give a sense of reality.

  • North Salt Lake, 700 sq. ft.: Family room + bath refresh, LVP, lighting, Safe’n’Sound ceiling. Target: mid-$30k.
  • Kaysville, 900 sq. ft.: Bedroom with egress, new bath, office nook, media wall with conduit. Target: $40k–$55k.
  • Lehi, 1,100 sq. ft.: Wet bar, gym flooring, theater wiring, custom storage. Target: $65k–$85k.

Again, square footage and finish selections swing the needle. But you can see how the pieces add up.


Frequently asked (and straight answers)

We hear the same questions, and they’re good ones.

  • Do basements need vapor barriers on walls? We prefer rigid foam against concrete instead of poly behind fiberglass. It keeps the wall warmer and reduces condensation risk.
  • Can I add a bedroom without an egress window? Not if you want it to count as a bedroom. We install egress wells that look clean and drain well.
  • Is LVP okay on concrete? Yes—especially over a subfloor system that lifts the plank and evens small slab variations.
  • Will finishing my basement raise my home value? Typically, yes. Resale in our market likes a legal bedroom, bath, and a bright living area.

Short answers today save long problems tomorrow.


Ready when you are

Want a basement that feels like part of the house, not an afterthought? Let’s sketch a plan that fits your budget and your life. Call 801-515-3473 or tap Request a Free Quote to get started. We’ll walk the space, share ideas, and give you a clear path from unfinished to unforgettable—for your home in Salt Lake County, Davis County, or Utah County.

Source

Disclaimer: all images are owned and copyright by their respective owners and website (utbasementfinishing.com) and “https://madcitybasement.com/blog” is for news, information, product news and reviews.

The 5 best Louvered Roof Companies in Edmonton

Suncoast Enclosures is a reputable, established screen room company founded in 1991. They got the idea for custom screen enclosures while in Australia. Building them to withstand snow loads and Canadian weather, Suncoast Enclosures has grown to offer screen rooms and more! The company has expanded to offer several locations throughout Canada. They offer high-quality louvered roof systems, three-season screen enclosures, retractable screens and more. If you want to improve your outdoor living space, while staying protect from bugs and the weather, contact Suncoast Enclosures for a consultation.

Address: 202-3476 93 St. NW, Edmonton, AB T6E 6A4

Sunday Closed
Monday 9 a.m.–5p.m.
Tuesday 9 a.m.–5 p.m.
Wednesday 9 a.m.–5 p.m.
Thursday 9 a.m.–5 p.m.
Friday 9 a.m.–5 p.m.
Saturday 10 a.m.–5 p.m.

LGM Patio Covers has served Edmonton and the surrounding areas since 2007. In that time, they’ve provided countless happy homeowners with reliable, high-quality shade and enclosure solutions. Their services include louvered roof systems, awnings, patio covers, decks, fencing and sunroom additions. They also provide maintenance and repair services to help you keep your new addition in top shape. Because not every home or need is the same, LGM prides itself in offering creative, custom solutions and high-end craftsmanship. They’ll ensure your new louvred roof system and outdoor living space are functional, beautiful and built to last. In addition, they offer a range of accessories to really make your space your own. Give them a call or visit their website for more information.

Key Services & Features

  • Louvered roof systems
  • Sunroom additions
  • Awnings
  • Custom patio covers
  • Decks and fences

Customer Feedback 

Really happy with the work Harry and his crew did on our deck and cover. They showed up when they said they would, worked efficiently, and the whole project was done on schedule. The craftsmanship is solid and it turned out great. Would definitely use them again.

– Navi, Google


4. Ideal Sundecks

Website: https://idealsundecks.ca/

Address: 7640  67 Street NW, Edmonton, AB T6B 2K4

Contact Details: 780-416-3325

Years in Business: 46 years

Business Hours:

Sunday Closed
Monday 9 a.m.–4 p.m.
Tuesday 9 a.m.–4 p.m.
Wednesday 9 a.m.–4 p.m.
Thursday 9 a.m.–4 p.m.
Friday 9 a.m.–4 p.m.
Saturday 10 a.m.–1 p.m.

Ideal Sundecks has been enhancing outdoor living spaces in Edmonton and the surrounding areas since 1979. Known for their sunrooms, solariums, and glass-roof patio covers, they help homeowners enjoy natural light and year-round comfort. Their team also builds modern louvered roof systems, decks, railings, screens, and other custom enclosure solutions, and each is backed by a strong warranty for added peace of mind.

With decades of experience and a reputation for reliable service, Ideal Sundecks completes projects on schedule and within budget. Owner Paul Doerksen ensures every client receives attentive service and high-quality workmanship. Contact them for a free consultation!

Key Services & Features

  • Louvered roof systems
  • Sundecks and solariums
  • Patio covers and shades
  • Three- and four-season sunrooms
  • Comprehensive warranty
  • Custom-made glass enclosures

Customer Feedback

We have a sun-room in our home that was poorly constructed by the previous owner. We contacted Ideal Sundecks and they offered to help us. Paul came over and gave two estimates along with advice. The roof is replaced and the sun-room looks like new. The entire process was professional and efficient. We are very pleased with services provided by Ideal Sundecks.

– Ian, Google


RenovationFind CertifiedRenovationFind Certified

Get 3 Free Estimates Today

Post your project and we will connect you with RenovationFind Certified Companies.


Sunday Closed
Monday 8 a.m.–4:30 p.m.
Tuesday 8 a.m.–4:30 p.m.
Wednesday 8 a.m.–4:30 p.m.
Thursday 8 a.m.–4:30 p.m.
Friday 8 a.m.–4:30 p.m.
Saturday Closed

Shignanski Construction is an established home renovation contractor in Edmonton. Since 2007, they’ve built a reputation for their commitment to customer service and quality. They offer interior and exterior renovations and can assist with your outdoor living spaces. With pergolas, awnings, patio covers and custom louvered roof systems, they’ll take your ideas and turn them into a reality. Shignanski can help with large scale home builds, remodels and backyard improvements that add value to your investment. Contact them to learn more.

Key Services & Features

  • Louvered roof systems and patio covers
  • Outdoor renovations
  • Decks and fences
  • Complete home renovations (interior and exterior)
  • Home builder

Customer Feedback

Had our fence replaced by Shignanski Construction. Extremely happy with the finished product. The staff were very organized, friendly & efficient. Everything was neat / area cleaned up at the end of each day. It was a positive experience from beginning to end. Thank you Steve & crew.

– Darcy, Google


What are the benefits of installing a louvered roof on your deck or patio?

A louvered roof is one of the most versatile and functional upgrades you can make to your outdoor living space. Unlike a fixed patio cover, a louvered system allows you to control sunlight, shade, and airflow with adjustable slats that open and close as needed. This flexibility makes it easy to enjoy your deck or patio in almost any weather. On hot summer days, you can tilt the louvers to create cooling shade, while still allowing airflow. When it rains, simply close the louvers to create a water-tight cover that lets you stay outside without worrying about getting wet.

Another major benefit is year-round usability. A louvered roof helps protect your outdoor furniture, decking materials, and appliances from sun exposure, UV damage, and moisture. That means a longer lifespan for your patio surfaces and less time spent on maintenance. With add-on features like integrated lighting, privacy screens, heaters, or motorized controls, you can turn your outdoor space into a comfortable extension of your home—ideal for entertaining, dining, or relaxing.

Aesthetically, louvered roofs offer a clean, modern look that can elevate your home’s exterior. They work well with most architectural styles and can be customized in size, colour, and configuration. Many systems are built from durable aluminum that won’t rust, warp, or fade, even in harsh climates like Edmonton’s.

Finally, a louvered roof can increase the value of your property. Outdoor living features are highly desirable for homebuyers, and a well-designed, functional patio cover can set your home apart. Whether you’re creating a cozy retreat or a fully equipped outdoor living room, a louvered roof provides comfort, style, and long-term durability. It can make your deck or patio far more enjoyable throughout the year.


Louvered Roof FAQs

1. Are louvered roofs waterproof?

Yes. When closed, most louvered roof systems are designed to be fully water-resistant. The louvers interlock to create a sealed surface, and built-in gutter systems channel rainwater away. This keeps your patio dry during rainstorms and allows you to use your outdoor space more often.

2. Can a louvered roof handle snow?

High-quality aluminum systems are engineered for cold climates and can withstand the snow loads common in Edmonton. However, not all models are the same. It’s important to choose a system specifically rated for four-season use or Alberta winters. Some systems require the louvers to remain open during heavy snowfall, while others are built to support snow accumulation.

3. How are louvered roofs operated?

Most modern systems are motorized and controlled with a remote or wall-mounted switch. You can adjust the louvers to different angles or close them completely. Premium options offer app-based control, rain sensors, and integrations with smart-home systems.

4. Can I add lighting, screens, or heaters to a louvered roof?

Absolutely. Louvered roofs are highly customizable and often designed to accommodate accessories such as LED lighting, privacy screens, bug screens, fans, and heating units. These upgrades can transform your patio into a comfortable, all-season living area.

5. How long does a louvered roof last?

Most systems are made from powder-coated aluminum, which is extremely durable and low-maintenance. A high-quality louvered roof can last 20–30 years or more with minimal upkeep. Routine cleaning and occasional lubrication of moving parts are typically all that’s required.

Source

Disclaimer: all images are owned and copyright by their respective owners and website (blog.renovationfind.com) and “https://madcitybasement.com/blog” is for news, information, product news and reviews.

Search For Products

Product has been added to your cart